> ## Documentation Index
> Fetch the complete documentation index at: https://www.greptile.com/docs/llms.txt
> Use this file to discover all available pages before exploring further.
# 5-Minute Quickstart
> Set up Greptile AI code reviews in 5 minutes. Connect GitHub or GitLab, configure review triggers, and get automated feedback on your first pull request.
This guide covers GitHub/GitLab setup, repository configuration, and your first automated code review.
## Installation & Setup
GitHub or GitLab users can follow the outlined steps to successfully enable Greptile within their repositories.
[Log in](https://app.greptile.com/login) to your Greptile account or [sign up](https://app.greptile.com/signup) via email, Google, Github, or GitLab.
Ensure you have the required permissions to allow the AI code reviewer access to all or specific repos. Each platform offers a different procedure for integration.
### GitHub App installation
The GitHub app gives Greptile access to your repositories and lets it post reviews on pull requests.
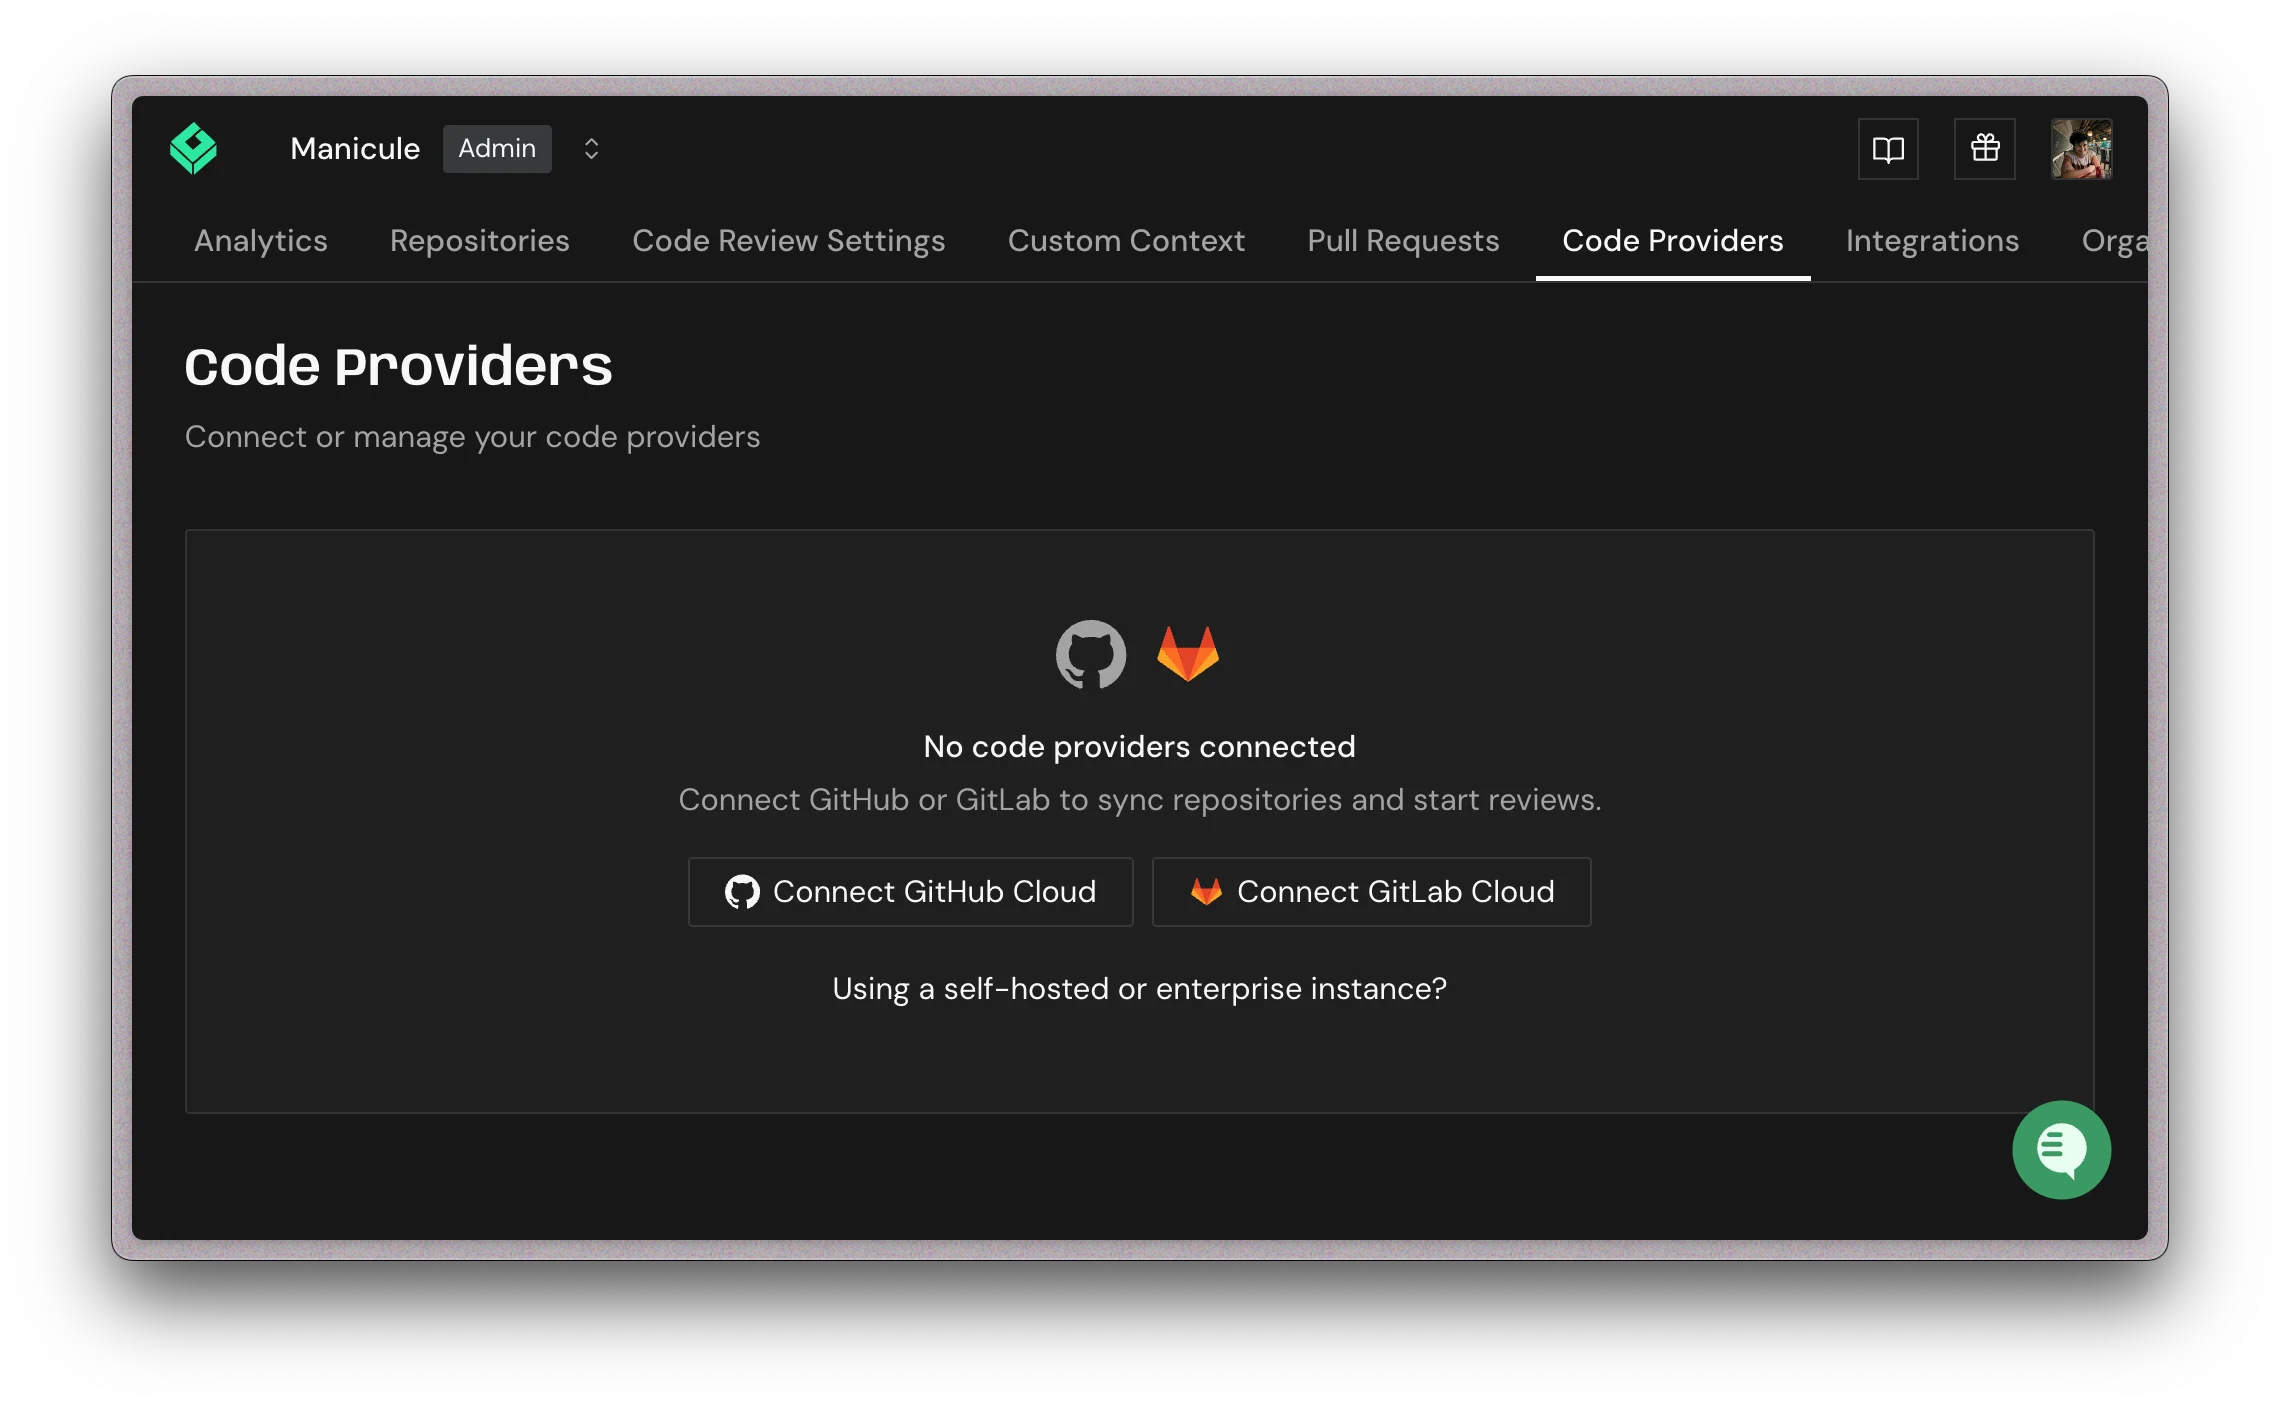
Go to **Code Providers**. Click Connect GitHub Cloud or Add Provider, then select GitHub.
 Open the Greptile Apps installer in GitHub
In GitHub, choose the account or organization where you want to install **Greptile Apps**. Use **Configure** for an existing installation.
Open the Greptile Apps installer in GitHub
In GitHub, choose the account or organization where you want to install **Greptile Apps**. Use **Configure** for an existing installation.
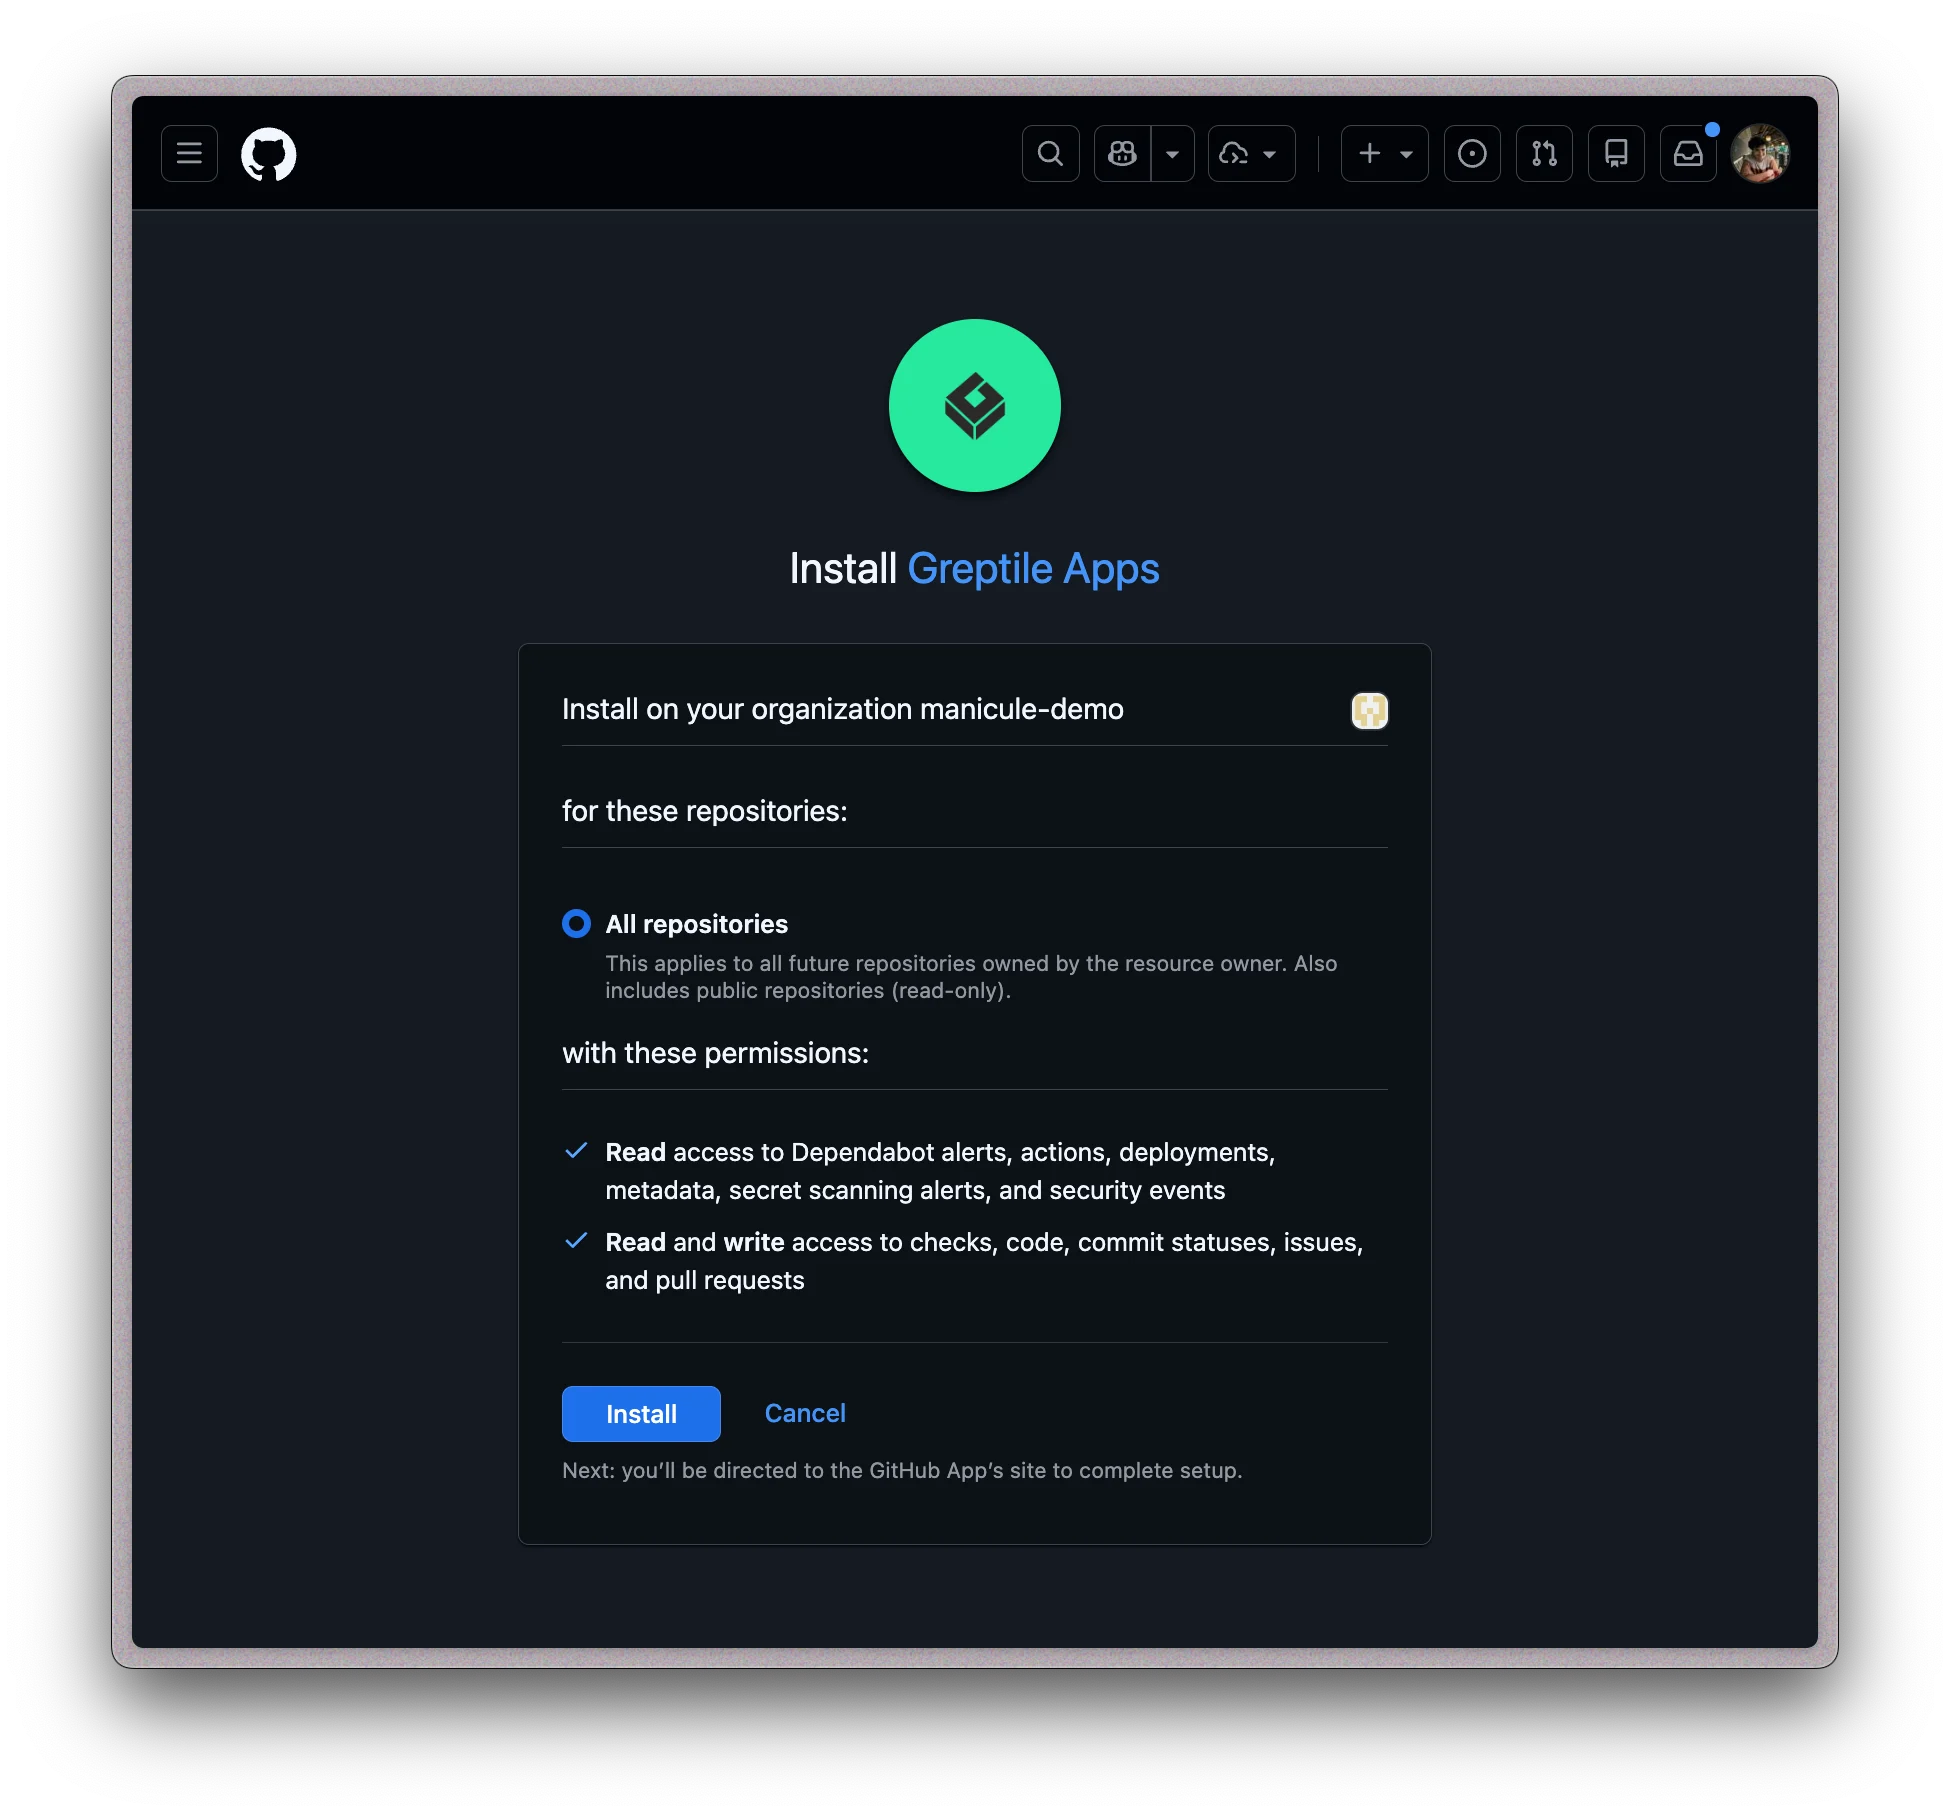
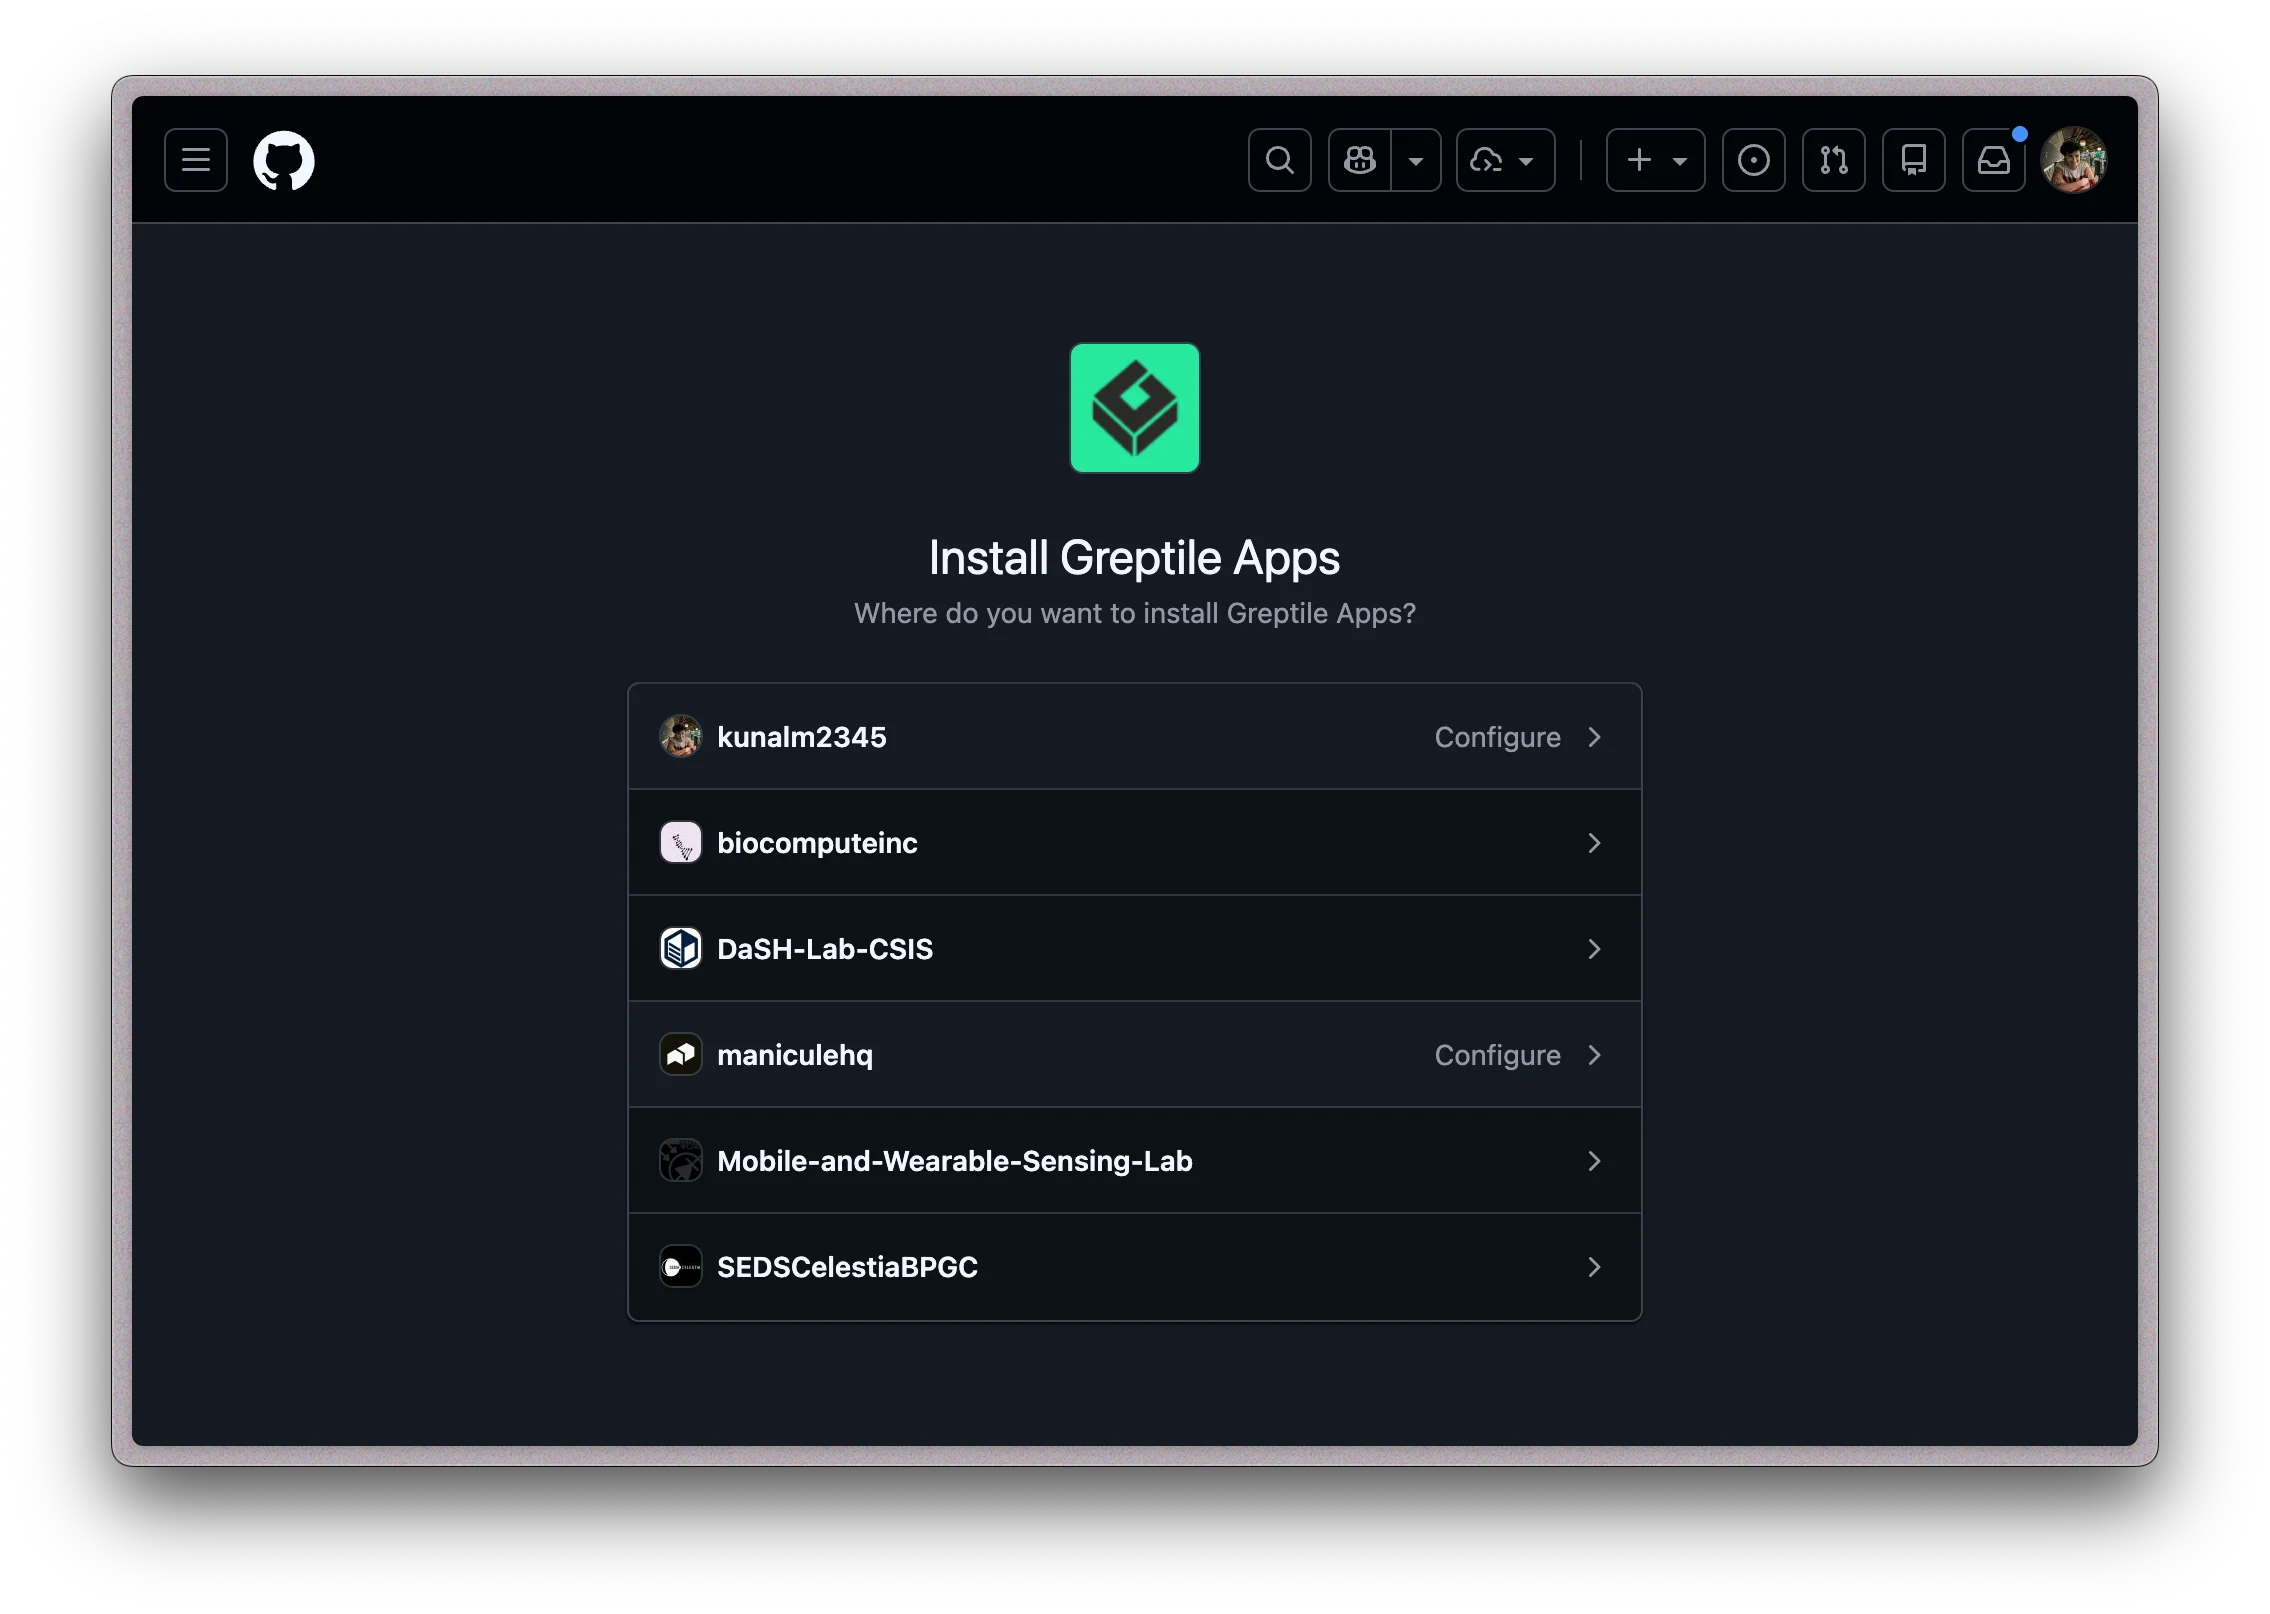 Choose a GitHub account or organization
Select which repositories GitHub lets Greptile access:
* **All repositories**: Grant access to all current and future repositories in the account or organization.
* **Only select repositories**: Grant access only to selected repositories. Select at least one repository.
Click Install or Update access.
Choose a GitHub account or organization
Select which repositories GitHub lets Greptile access:
* **All repositories**: Grant access to all current and future repositories in the account or organization.
* **Only select repositories**: Grant access only to selected repositories. Select at least one repository.
Click Install or Update access.
 Install Greptile Apps in GitHub
After you click Install, GitHub automatically returns you to Greptile. Select the GitHub organization, then click Link.
You can add more organizations later from **Code Providers**.
Install Greptile Apps in GitHub
After you click Install, GitHub automatically returns you to Greptile. Select the GitHub organization, then click Link.
You can add more organizations later from **Code Providers**.
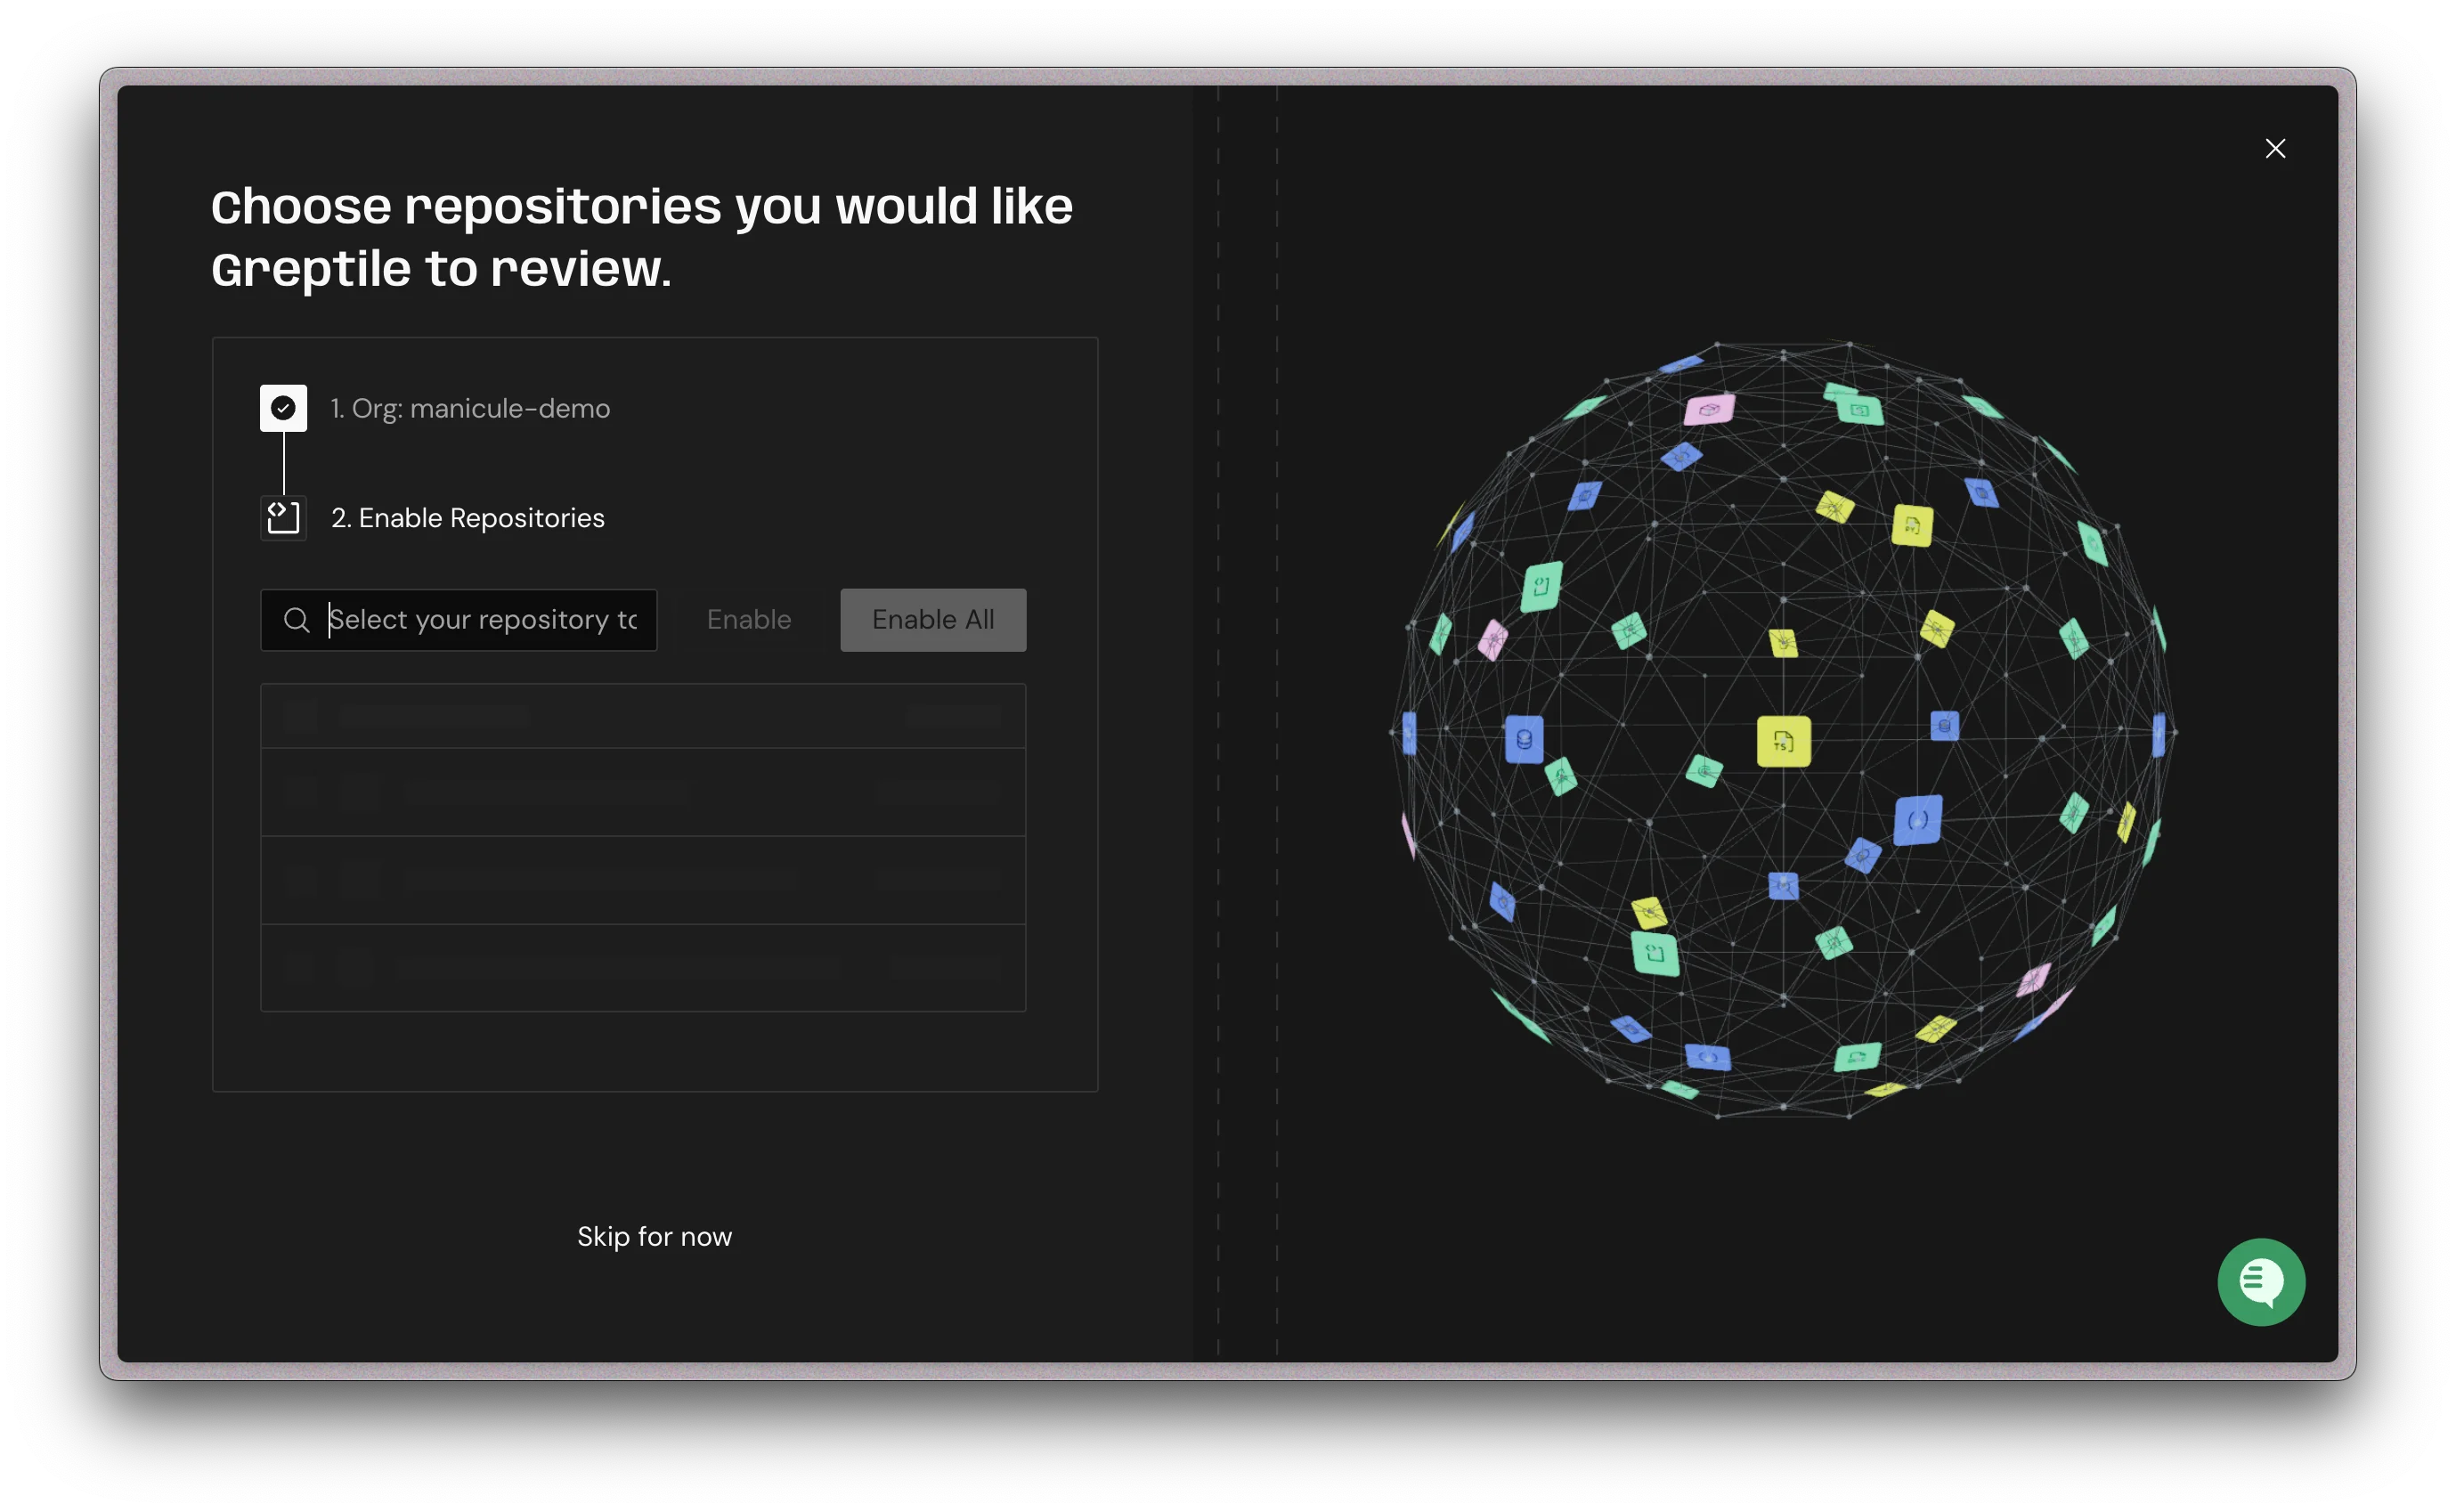
 Link a GitHub organization to Greptile
If your GitHub organization is missing from this list, see [Troubleshooting: GitHub organization not listed](/troubleshooting/common-issues#github-organization-not-listed).
Select the repositories you want Greptile to review, then click Enable.
Use Enable All to turn on all repositories that GitHub granted access to.
Link a GitHub organization to Greptile
If your GitHub organization is missing from this list, see [Troubleshooting: GitHub organization not listed](/troubleshooting/common-issues#github-organization-not-listed).
Select the repositories you want Greptile to review, then click Enable.
Use Enable All to turn on all repositories that GitHub granted access to.
 Enable GitHub repositories for review
### GitLab Integration
The GitLab integration uses a project or group access token. The token must use the **Developer** role and the `api` scope.
Go to **Code Providers** in Greptile and click **Add Provider**, then select GitLab. Greptile shows the token requirements and a field for the generated token.
Enable GitHub repositories for review
### GitLab Integration
The GitLab integration uses a project or group access token. The token must use the **Developer** role and the `api` scope.
Go to **Code Providers** in Greptile and click **Add Provider**, then select GitLab. Greptile shows the token requirements and a field for the generated token.
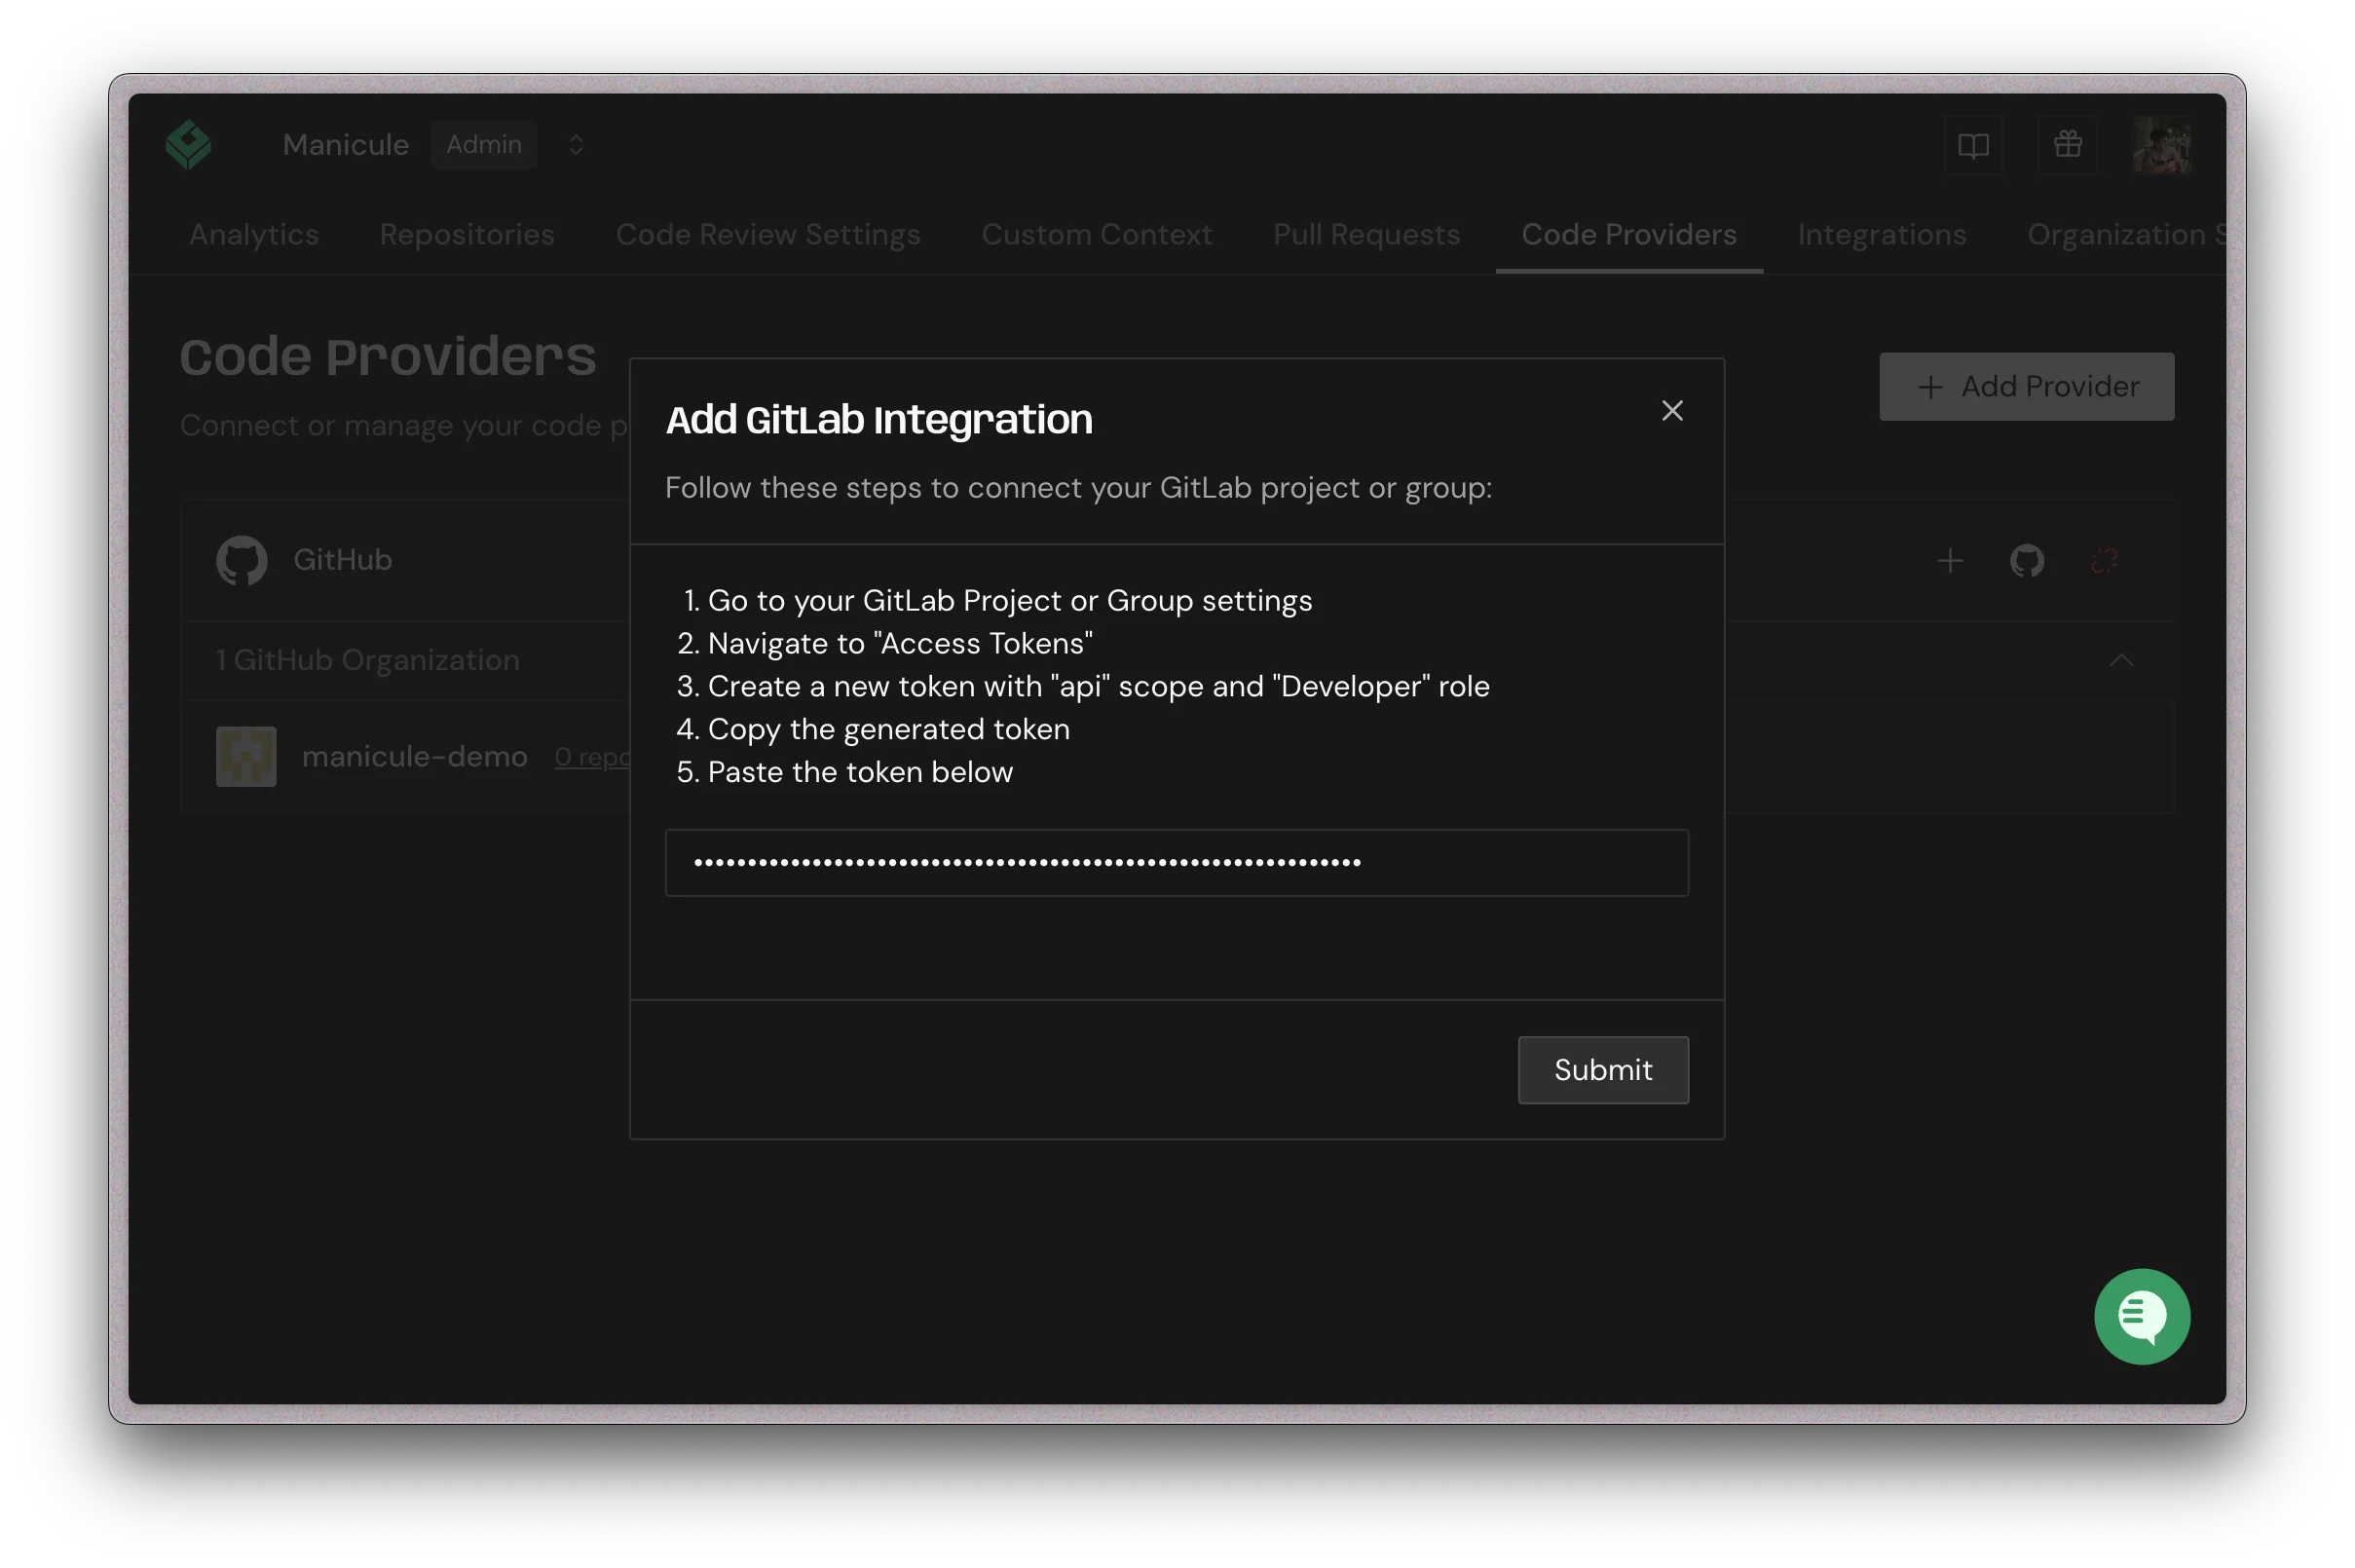 Add GitLab integration in Greptile
In GitLab, open your project or group, then go to **Settings** → **Access tokens**.
Add GitLab integration in Greptile
In GitLab, open your project or group, then go to **Settings** → **Access tokens**.
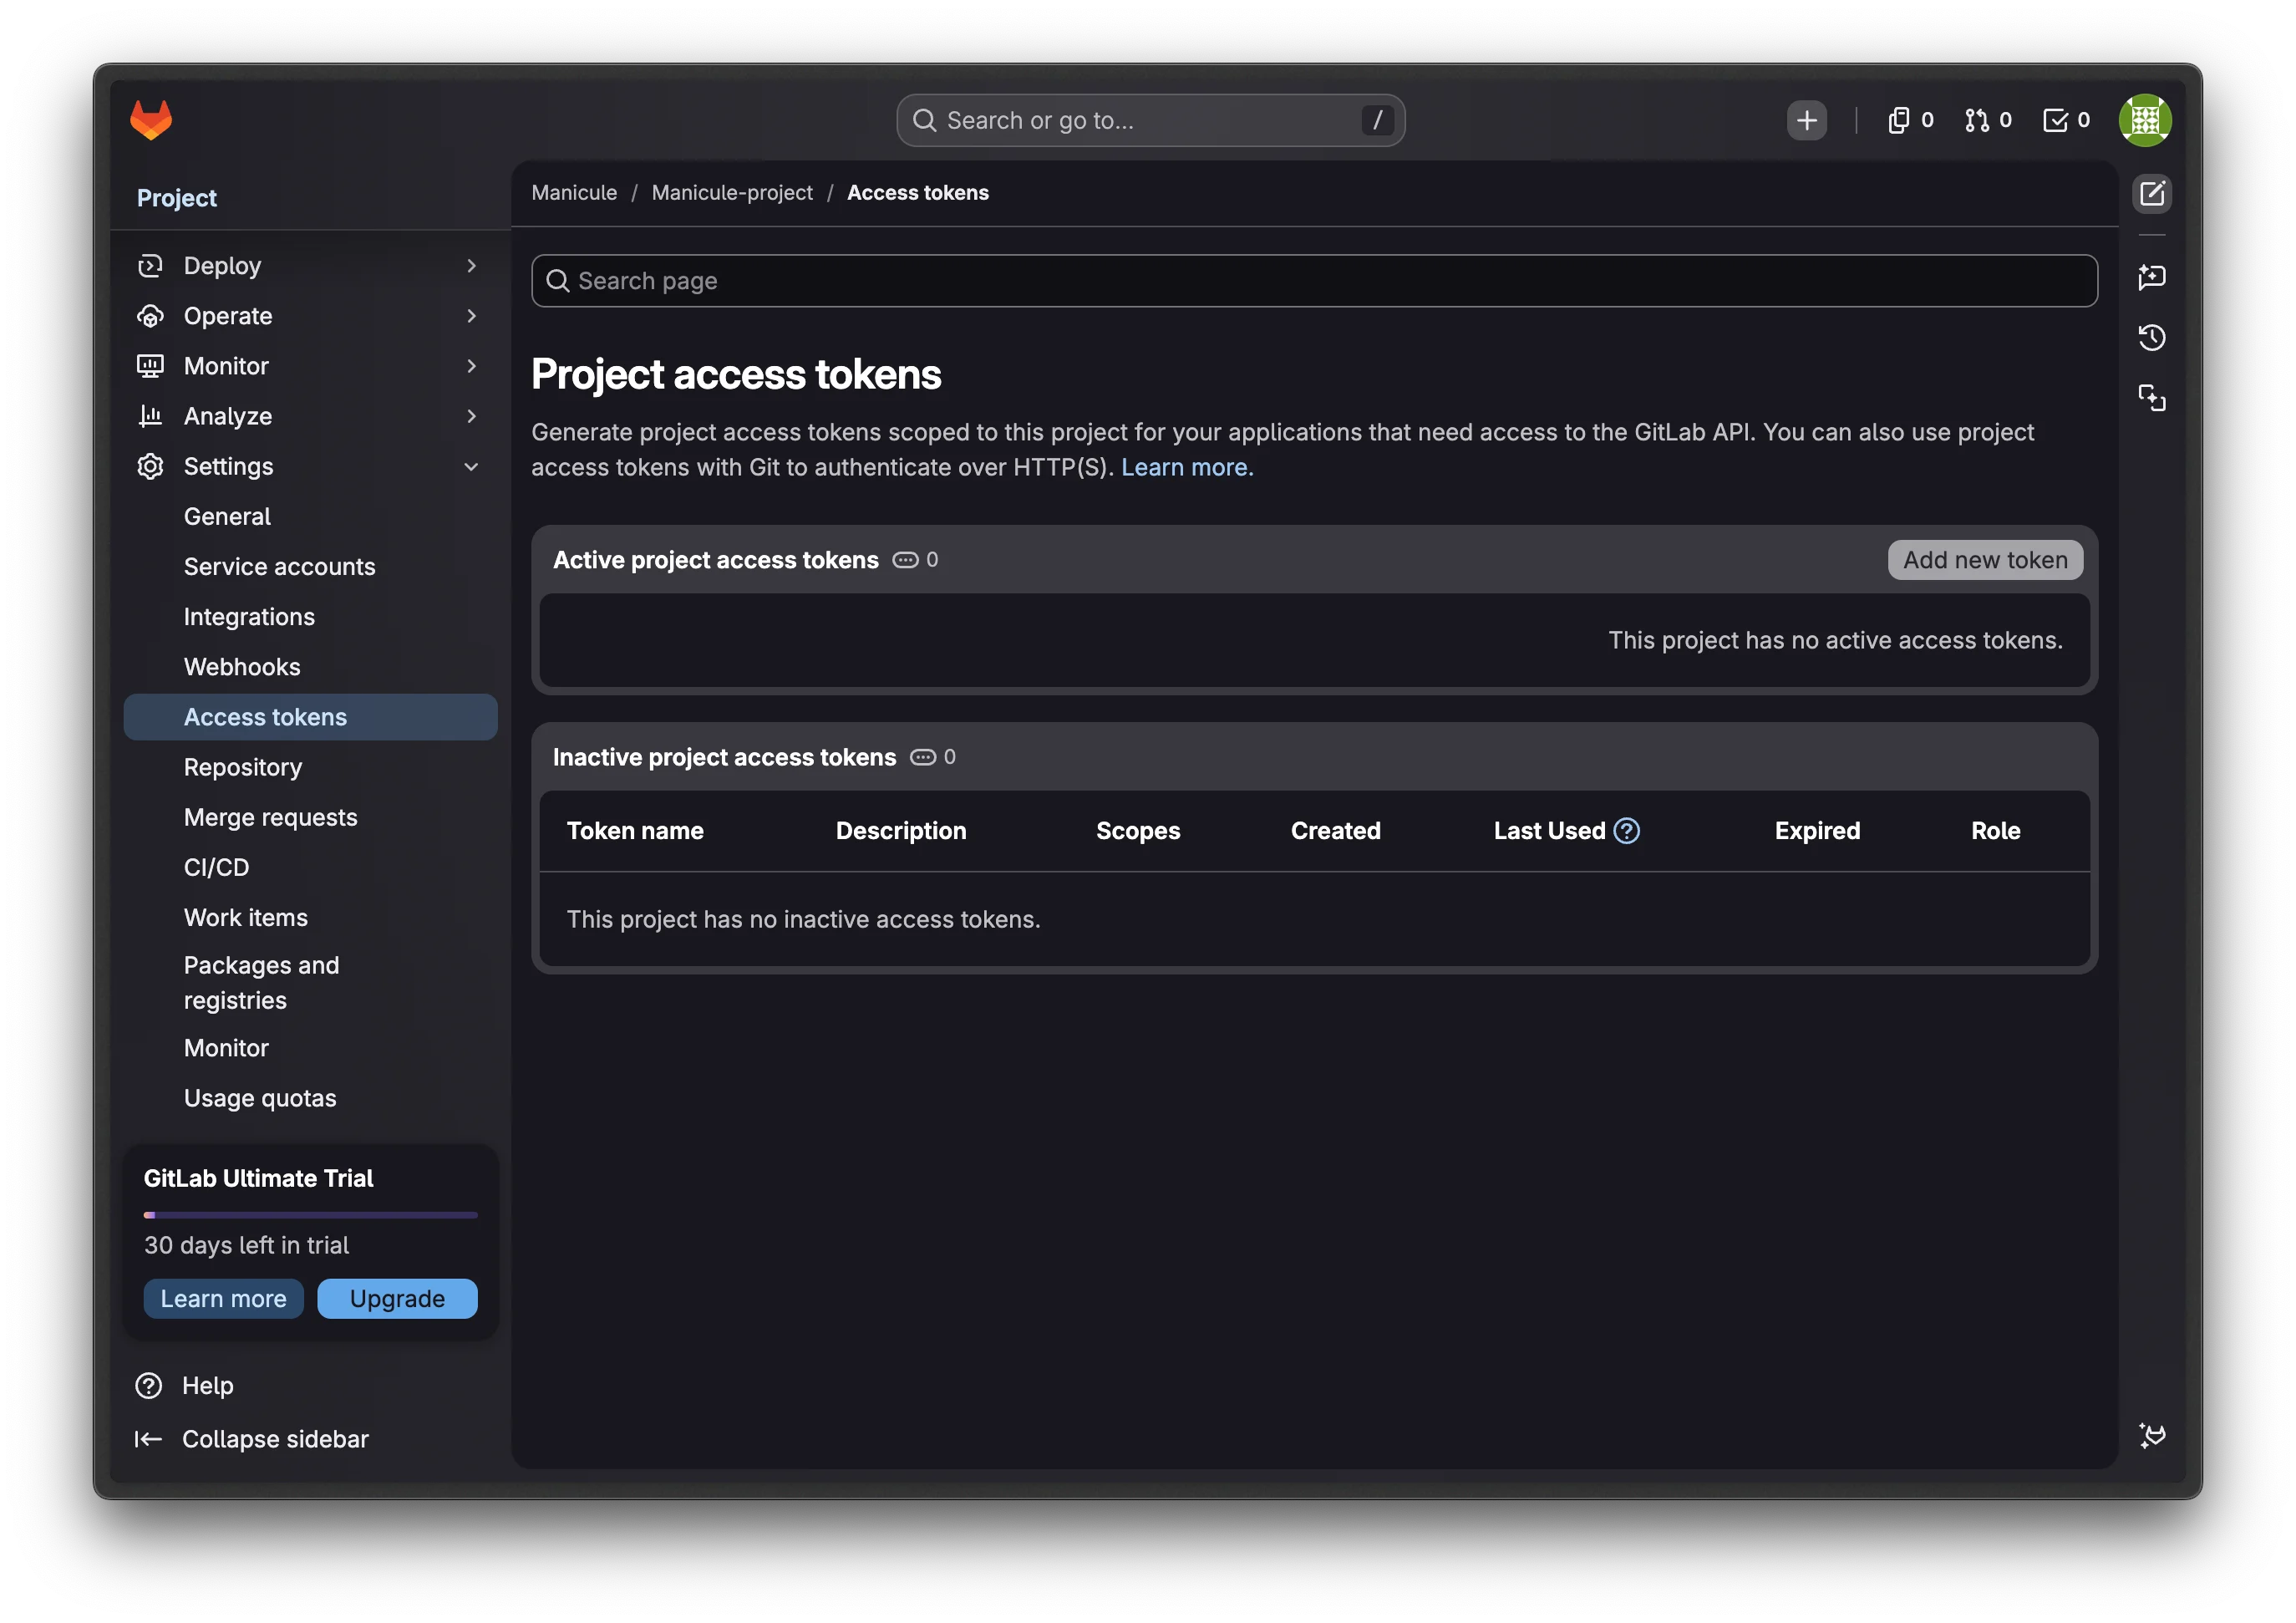 Open GitLab access tokens
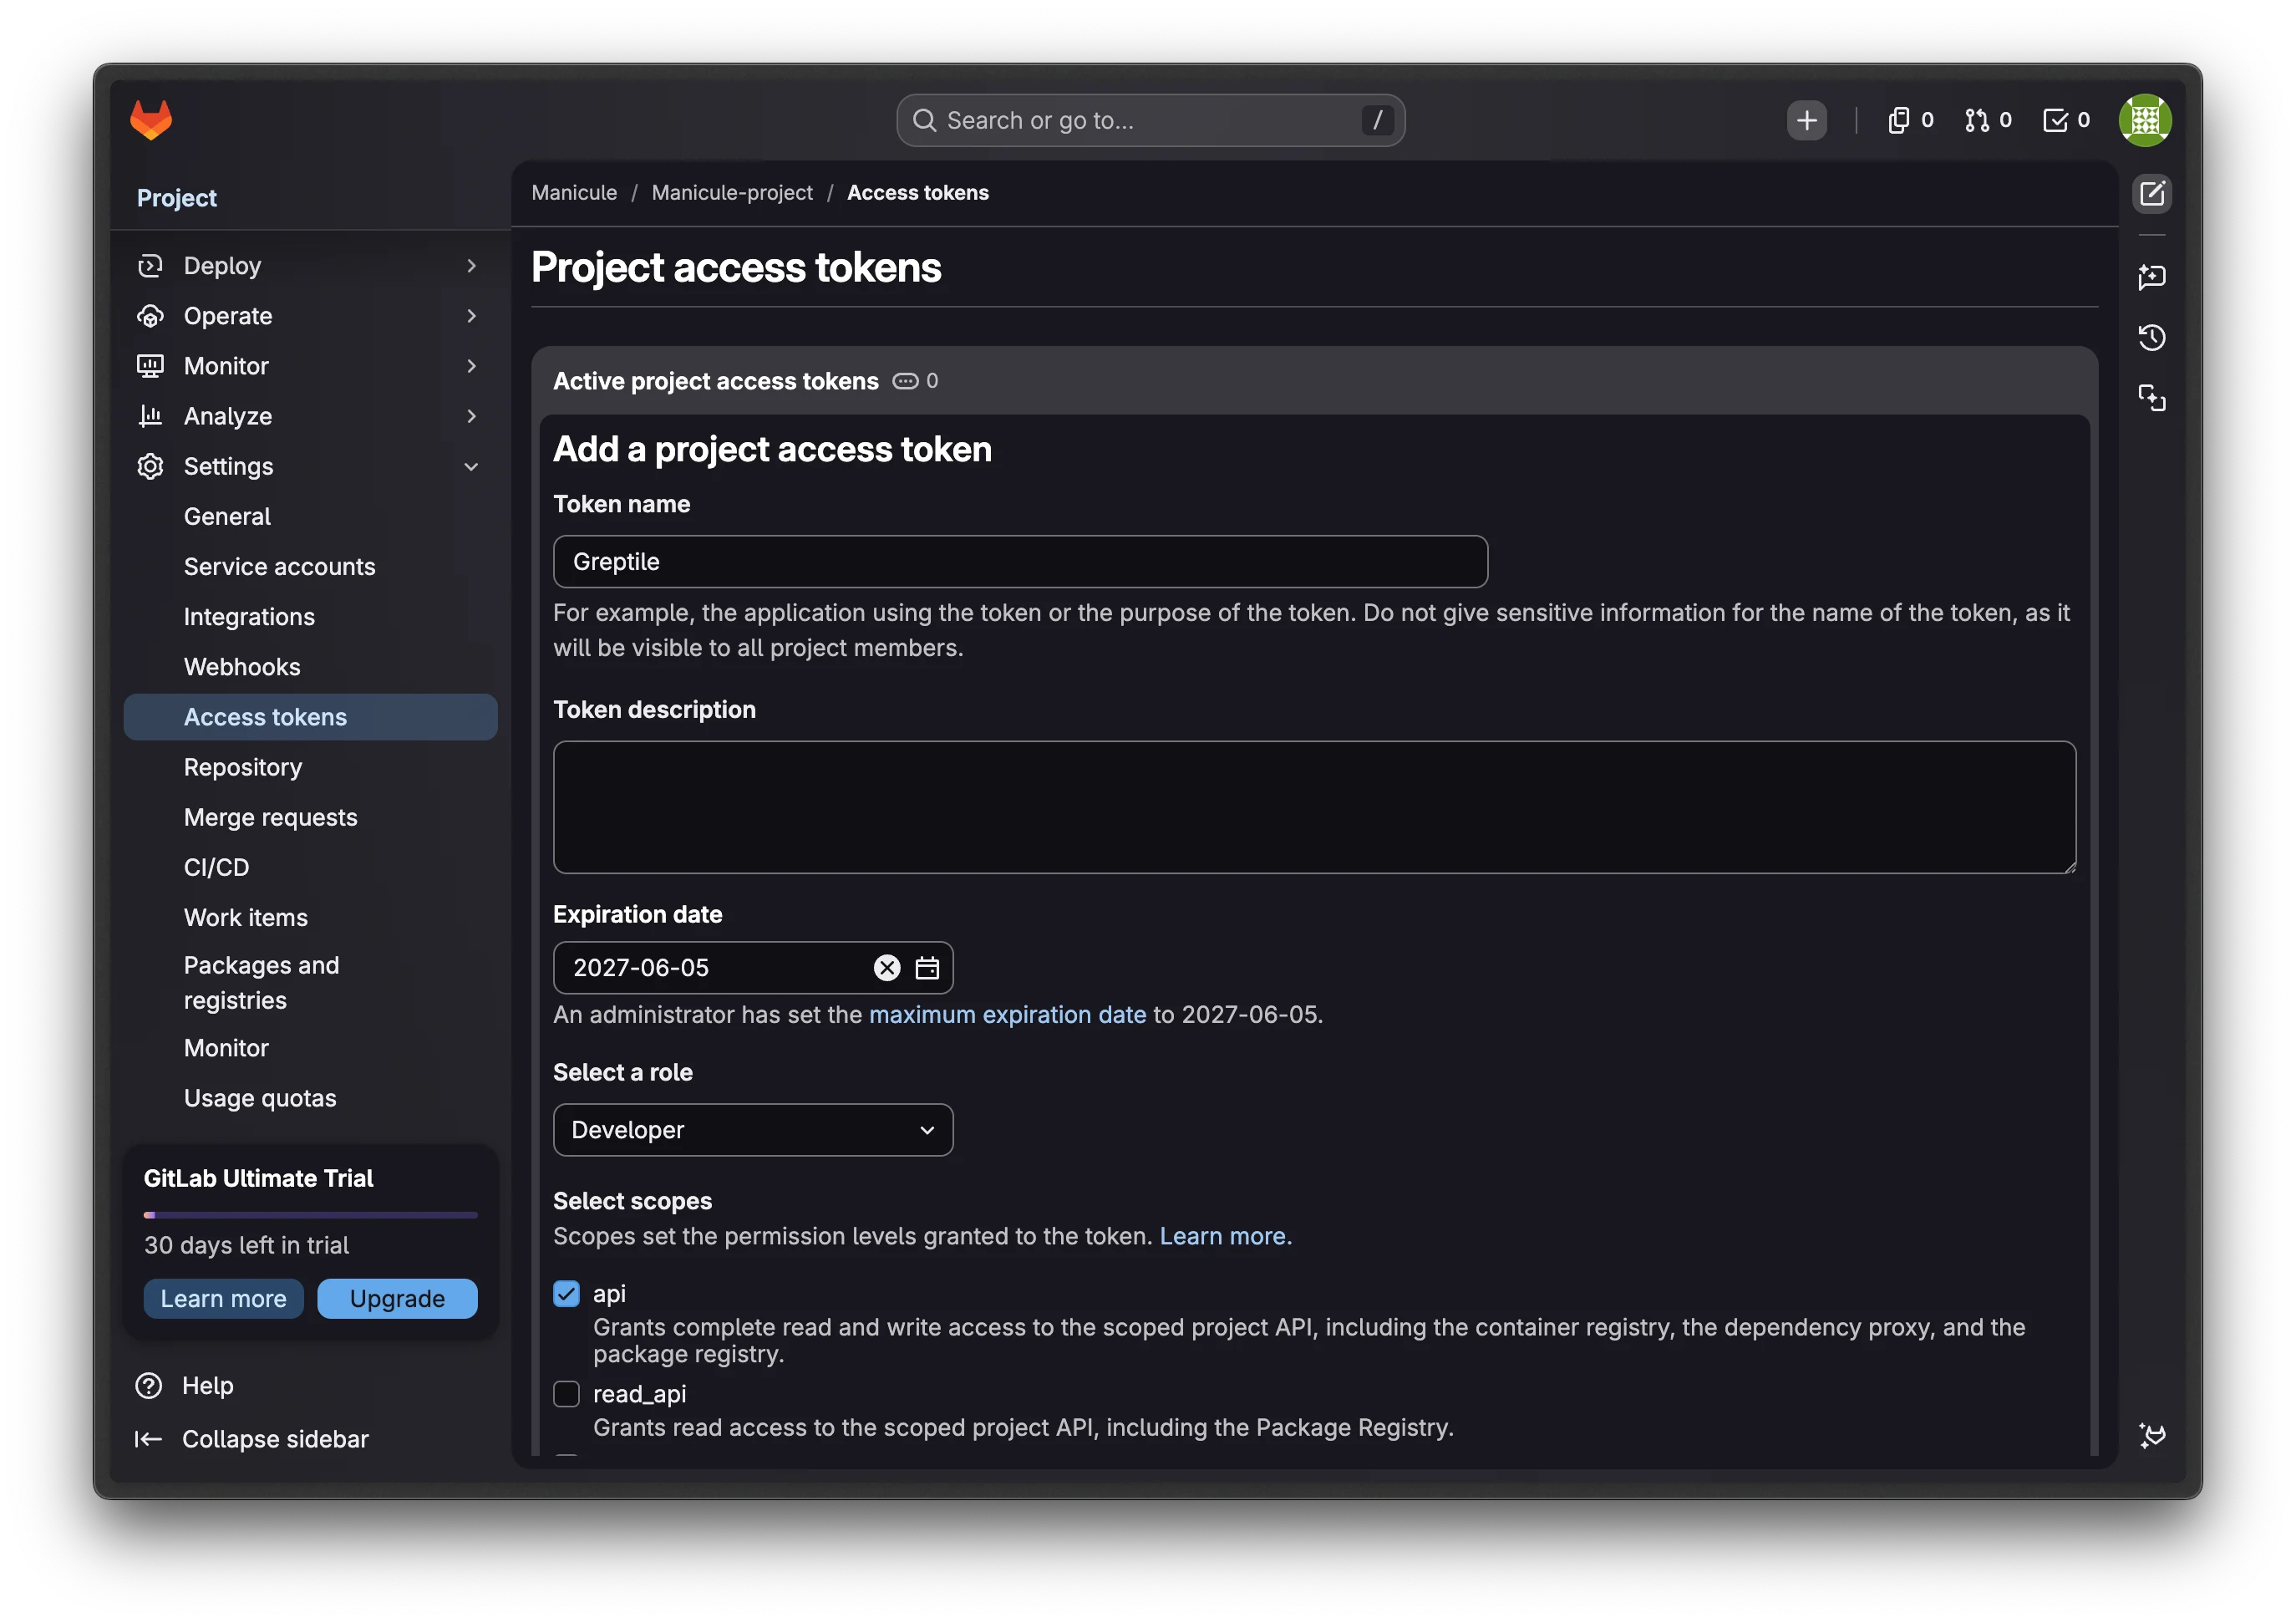
Create a token with:
* **Token name**: `Greptile`
* **Role**: `Developer`
* **Scope**: `api`
* **Expiration date**: the latest allowed date
Open GitLab access tokens
Create a token with:
* **Token name**: `Greptile`
* **Role**: `Developer`
* **Scope**: `api`
* **Expiration date**: the latest allowed date
 Create a GitLab access token
Copy the token. GitLab only shows it once.
Create a GitLab access token
Copy the token. GitLab only shows it once.
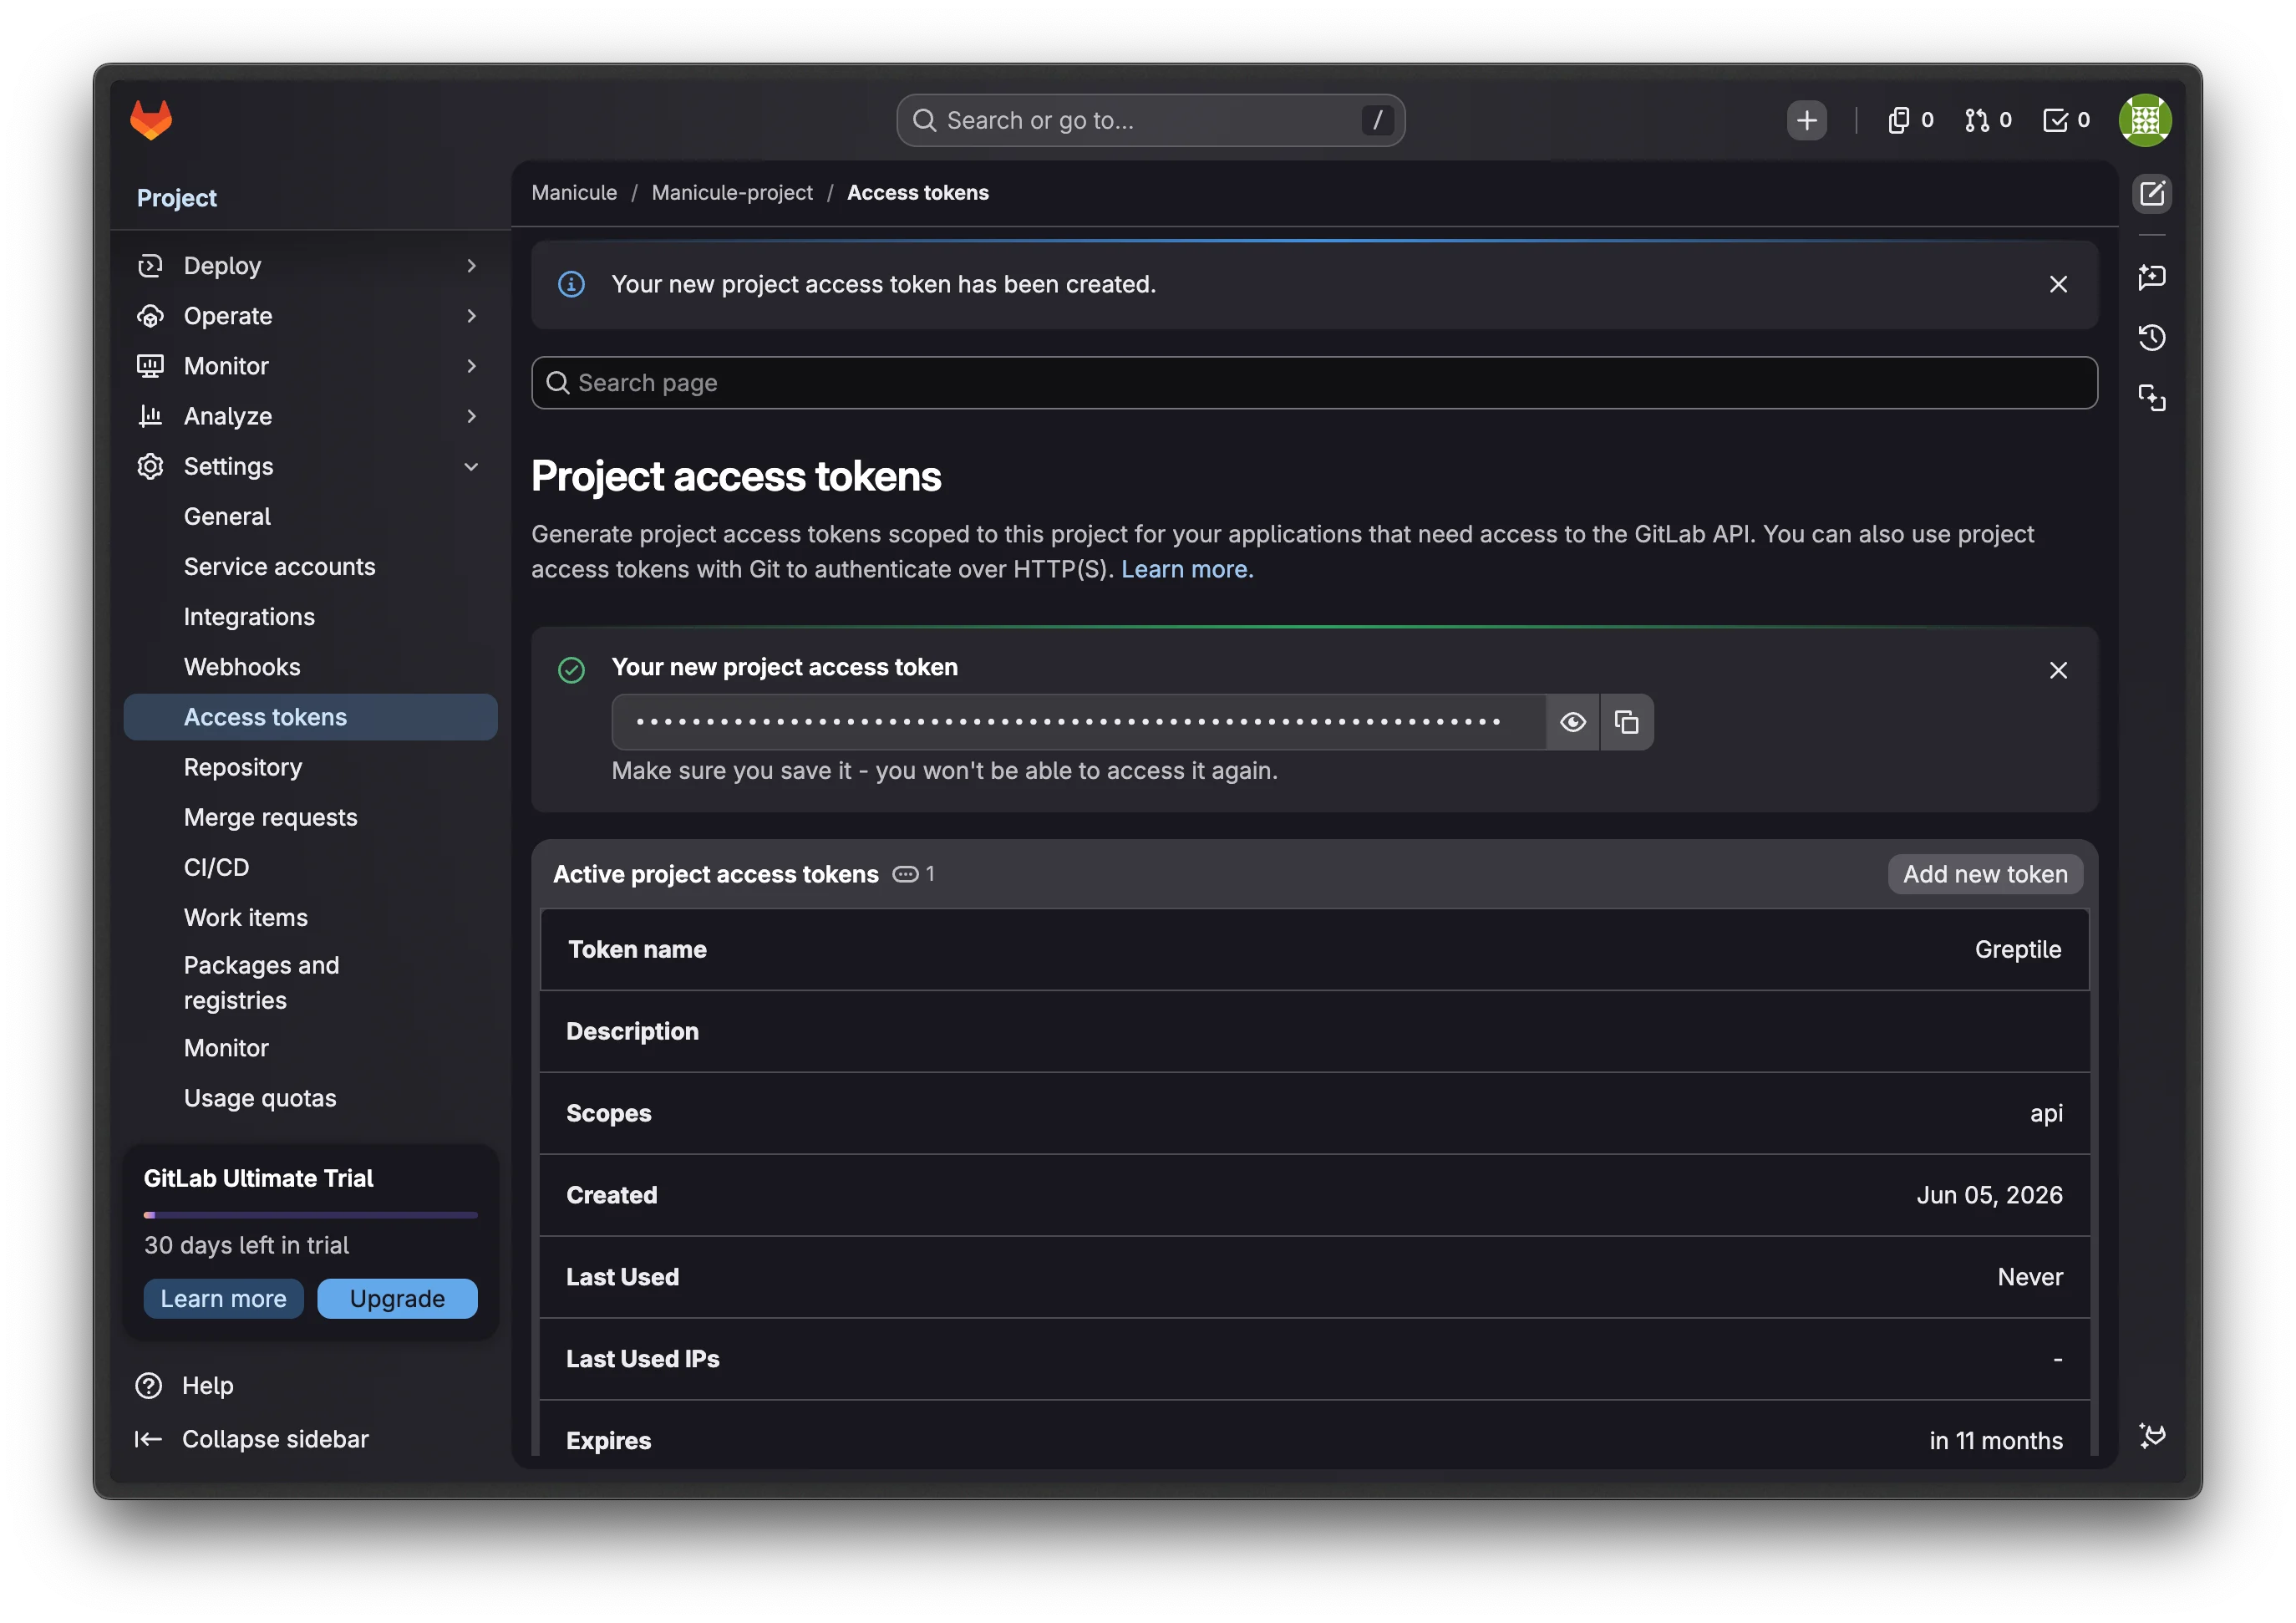 Copy the generated GitLab token
Paste the token into the GitLab integration modal, then click Submit.
Submit the GitLab token in Greptile
Greptile shows the webhook URL, secret token, and required triggers after you submit the token.
Copy the generated GitLab token
Paste the token into the GitLab integration modal, then click Submit.
Submit the GitLab token in Greptile
Greptile shows the webhook URL, secret token, and required triggers after you submit the token.
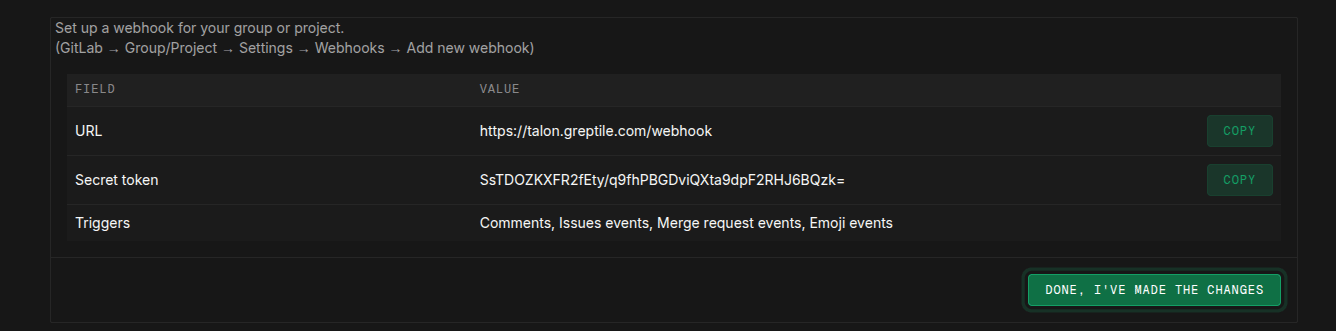 GitLab webhook configuration details
In GitLab, open your project or group, then go to **Settings** → **Webhooks**. Add a webhook with:
* **URL**: `https://talon.greptile.com/webhook`
* **Secret token**: copy from Greptile
* **Triggers**: Comments, Issues events, Merge request events, Emoji events
Click Add webhook, then return to Greptile and click Done, I have made the changes.
Select the GitLab group, then click Link.
GitLab webhook configuration details
In GitLab, open your project or group, then go to **Settings** → **Webhooks**. Add a webhook with:
* **URL**: `https://talon.greptile.com/webhook`
* **Secret token**: copy from Greptile
* **Triggers**: Comments, Issues events, Merge request events, Emoji events
Click Add webhook, then return to Greptile and click Done, I have made the changes.
Select the GitLab group, then click Link.
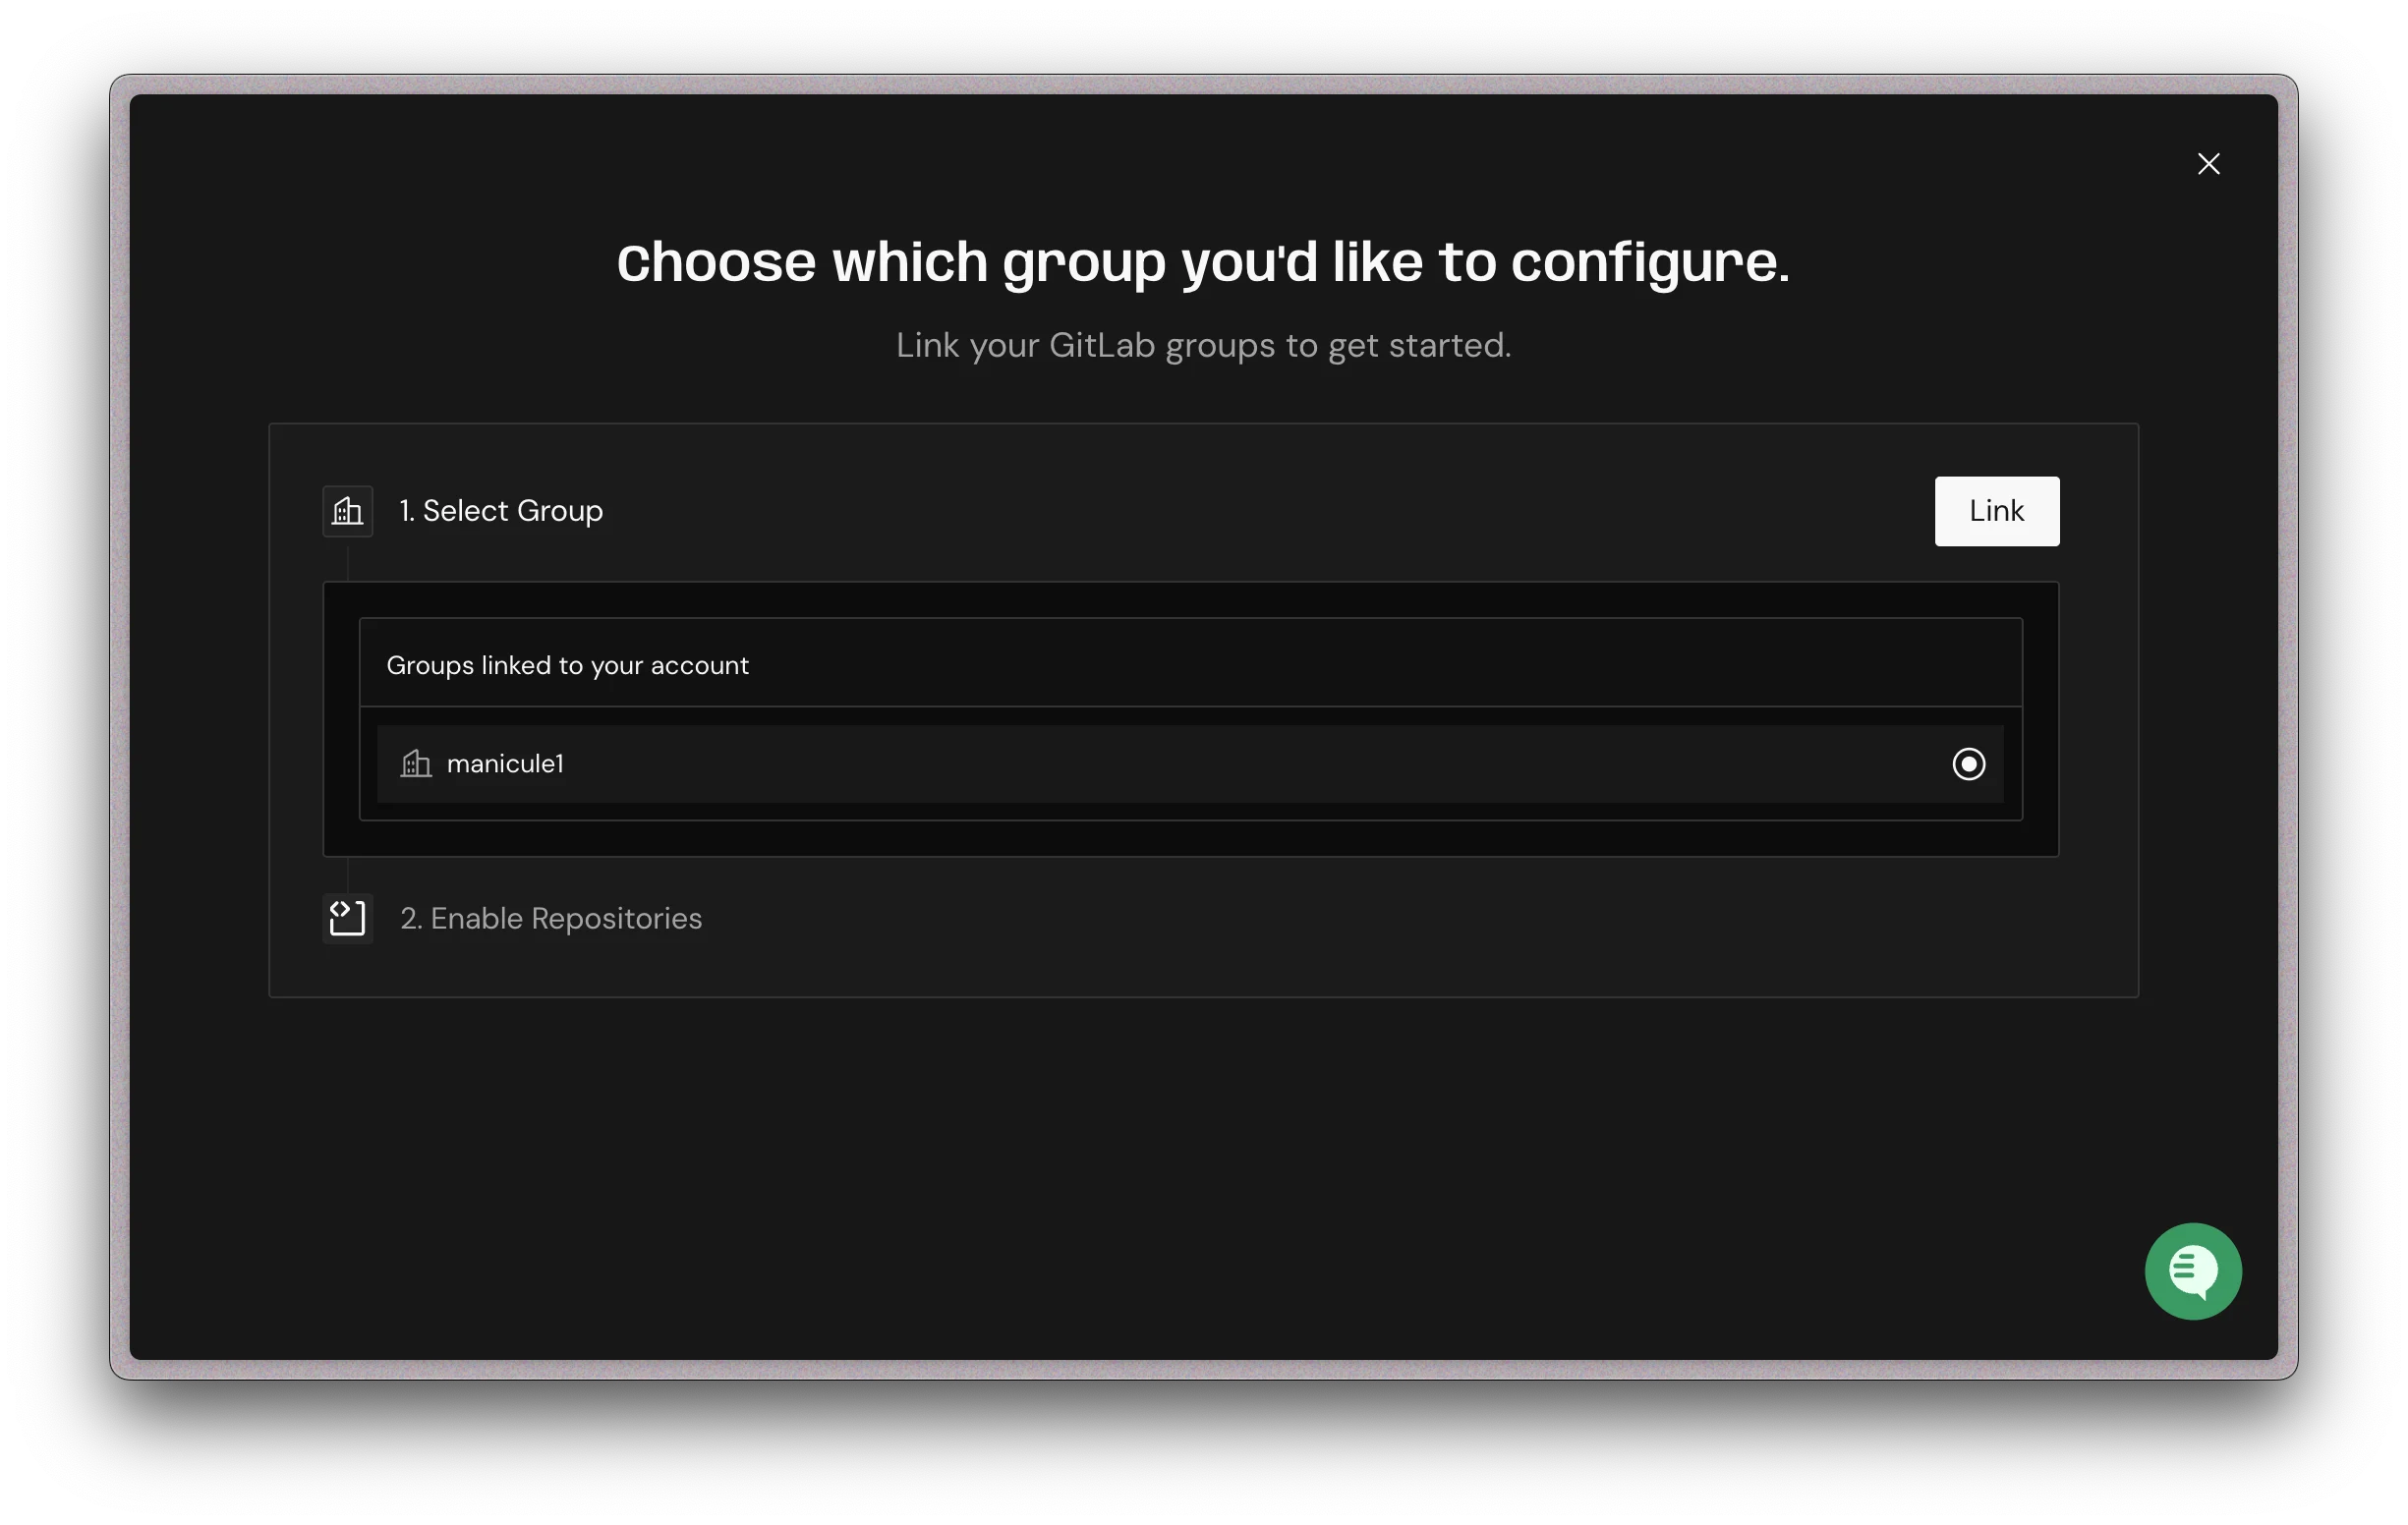 Link a GitLab group to Greptile
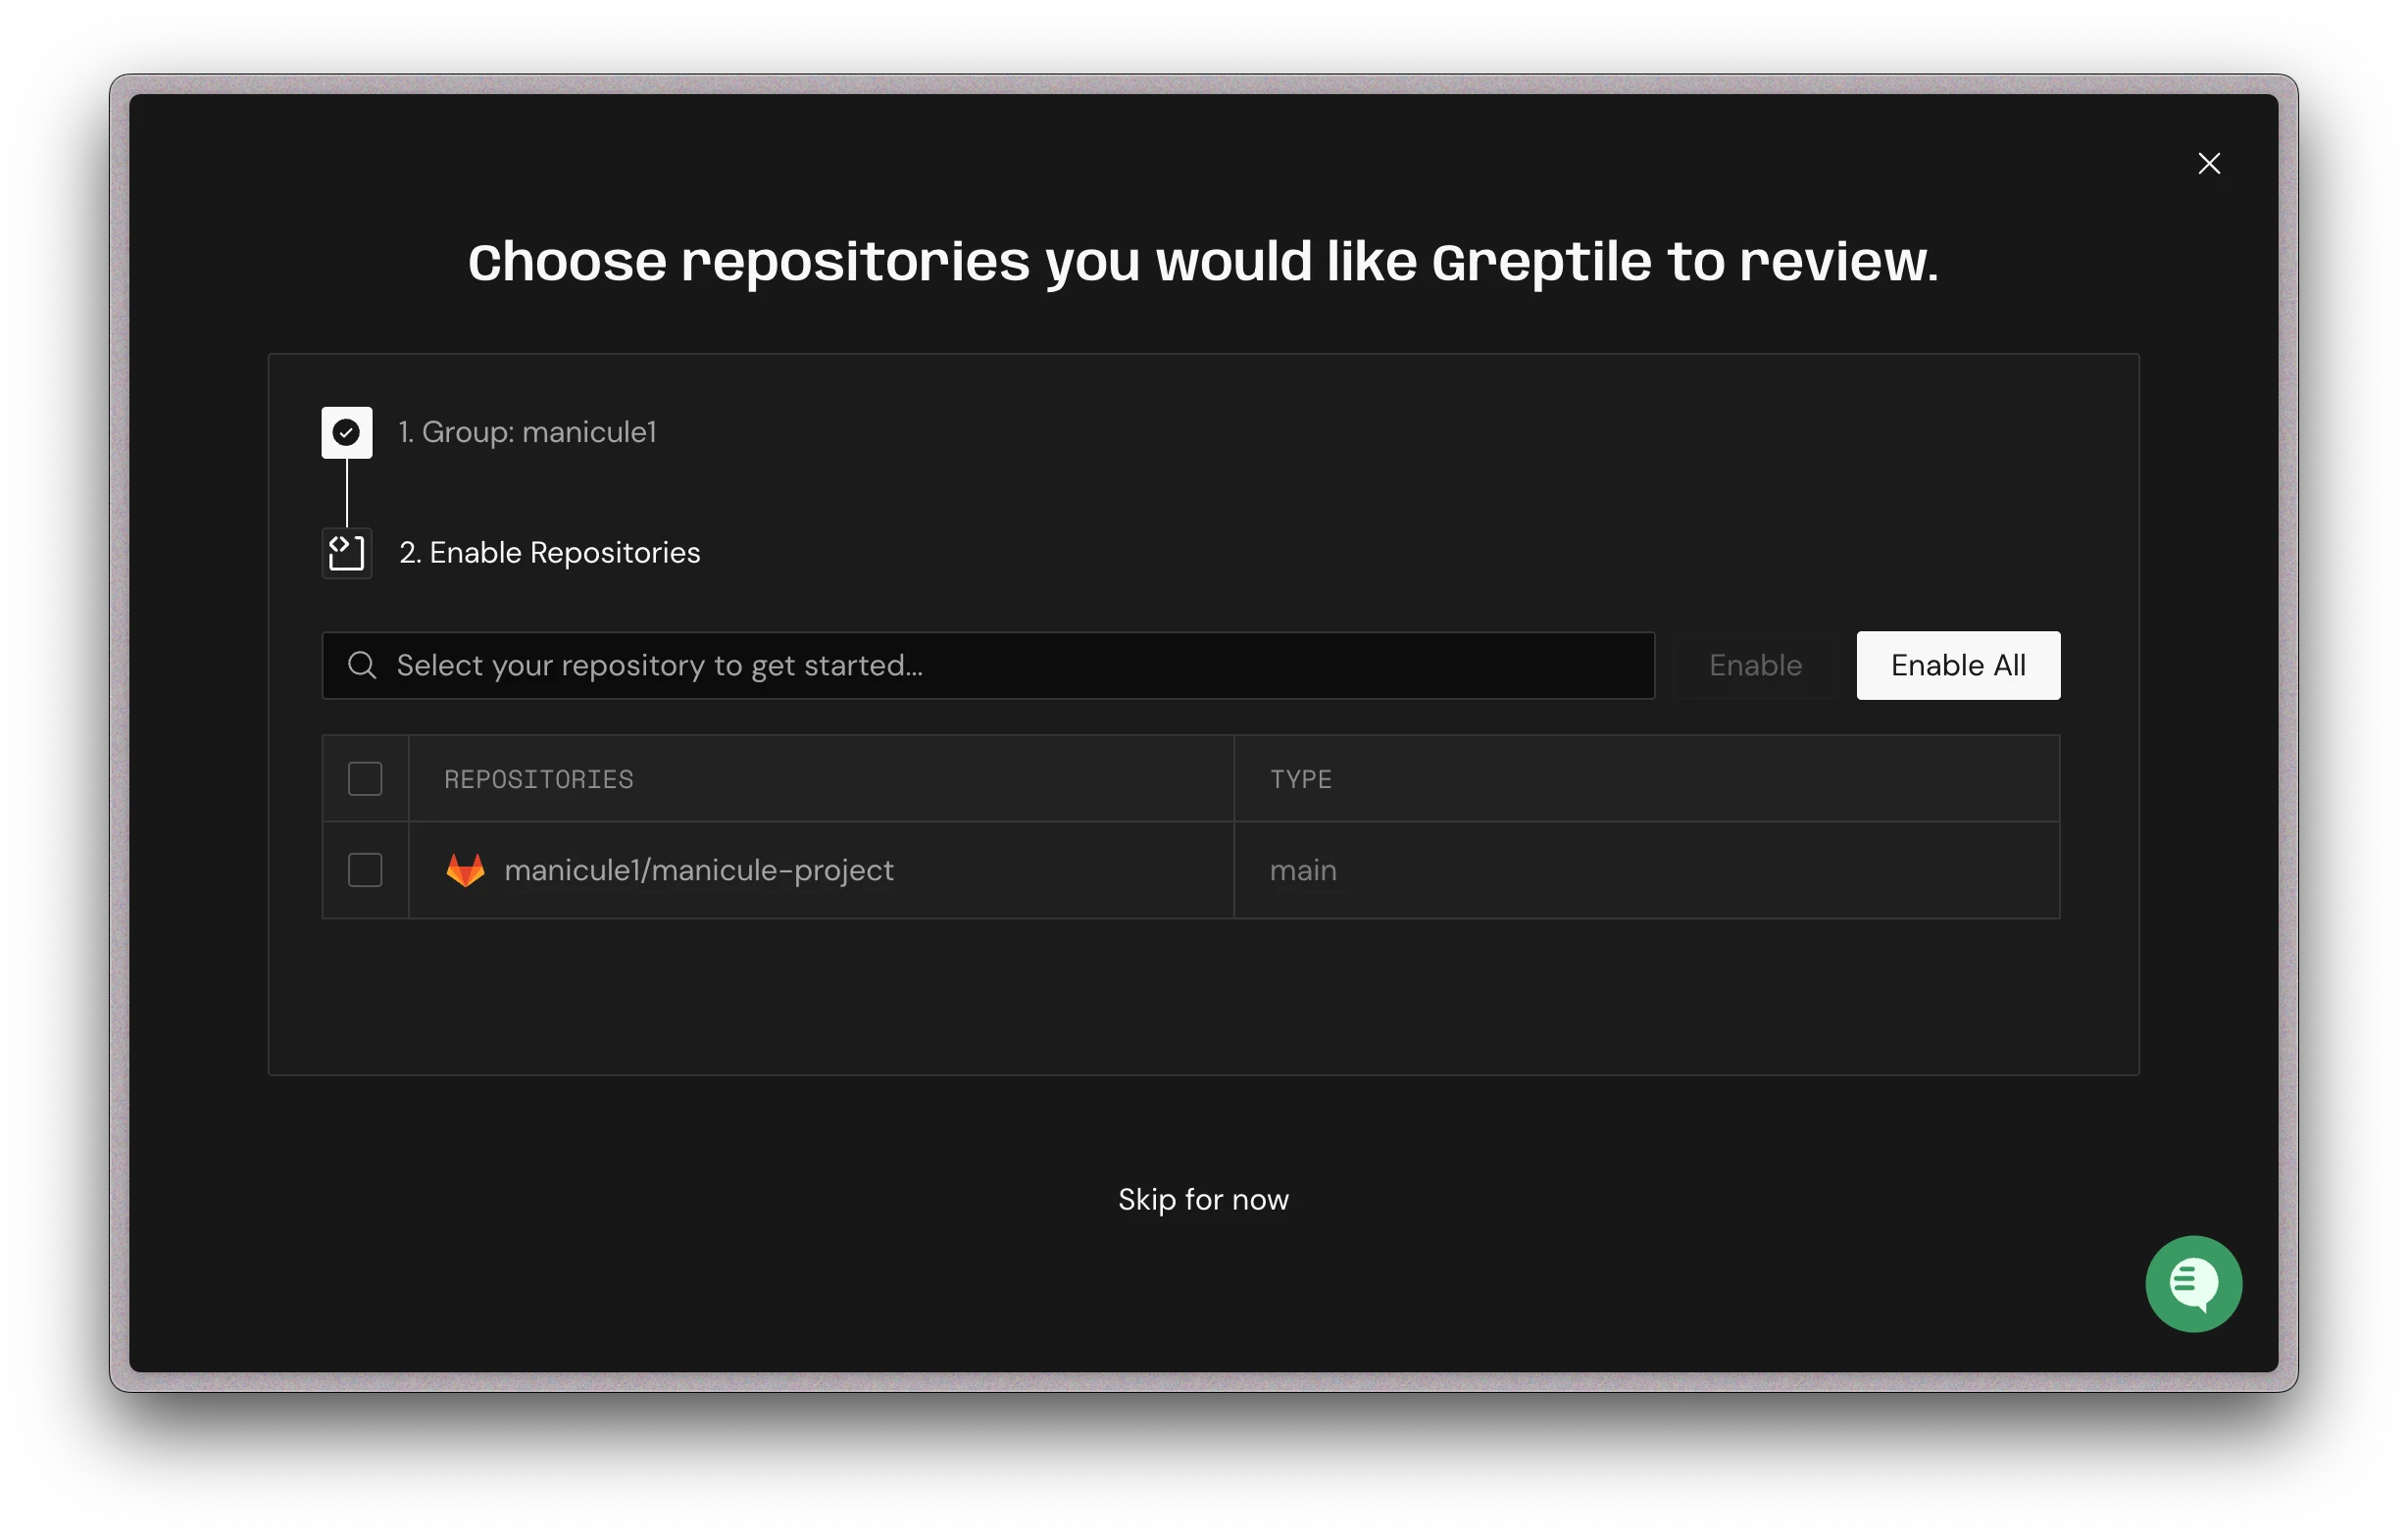
Select the GitLab repositories you want Greptile to review, then click Enable.
Use Enable All to turn on every listed repository.
Link a GitLab group to Greptile
Select the GitLab repositories you want Greptile to review, then click Enable.
Use Enable All to turn on every listed repository.
 Enable GitLab repositories for review
### Repository Selection & Configuration
The following configuration steps are common to GitHub and GitLab:
1. Go to your team's **Repositories** page
2. Click **Manage Repos** (or **Enable Repositories** if no repos are enabled yet)
3. Select the repos you want reviewed, then click **Enable Repos** (or use **Enable All**)
To automatically enable future repos, go to **Code Review Settings** and toggle **Auto-enable New Repos**.
Enable GitLab repositories for review
### Repository Selection & Configuration
The following configuration steps are common to GitHub and GitLab:
1. Go to your team's **Repositories** page
2. Click **Manage Repos** (or **Enable Repositories** if no repos are enabled yet)
3. Select the repos you want reviewed, then click **Enable Repos** (or use **Enable All**)
To automatically enable future repos, go to **Code Review Settings** and toggle **Auto-enable New Repos**.
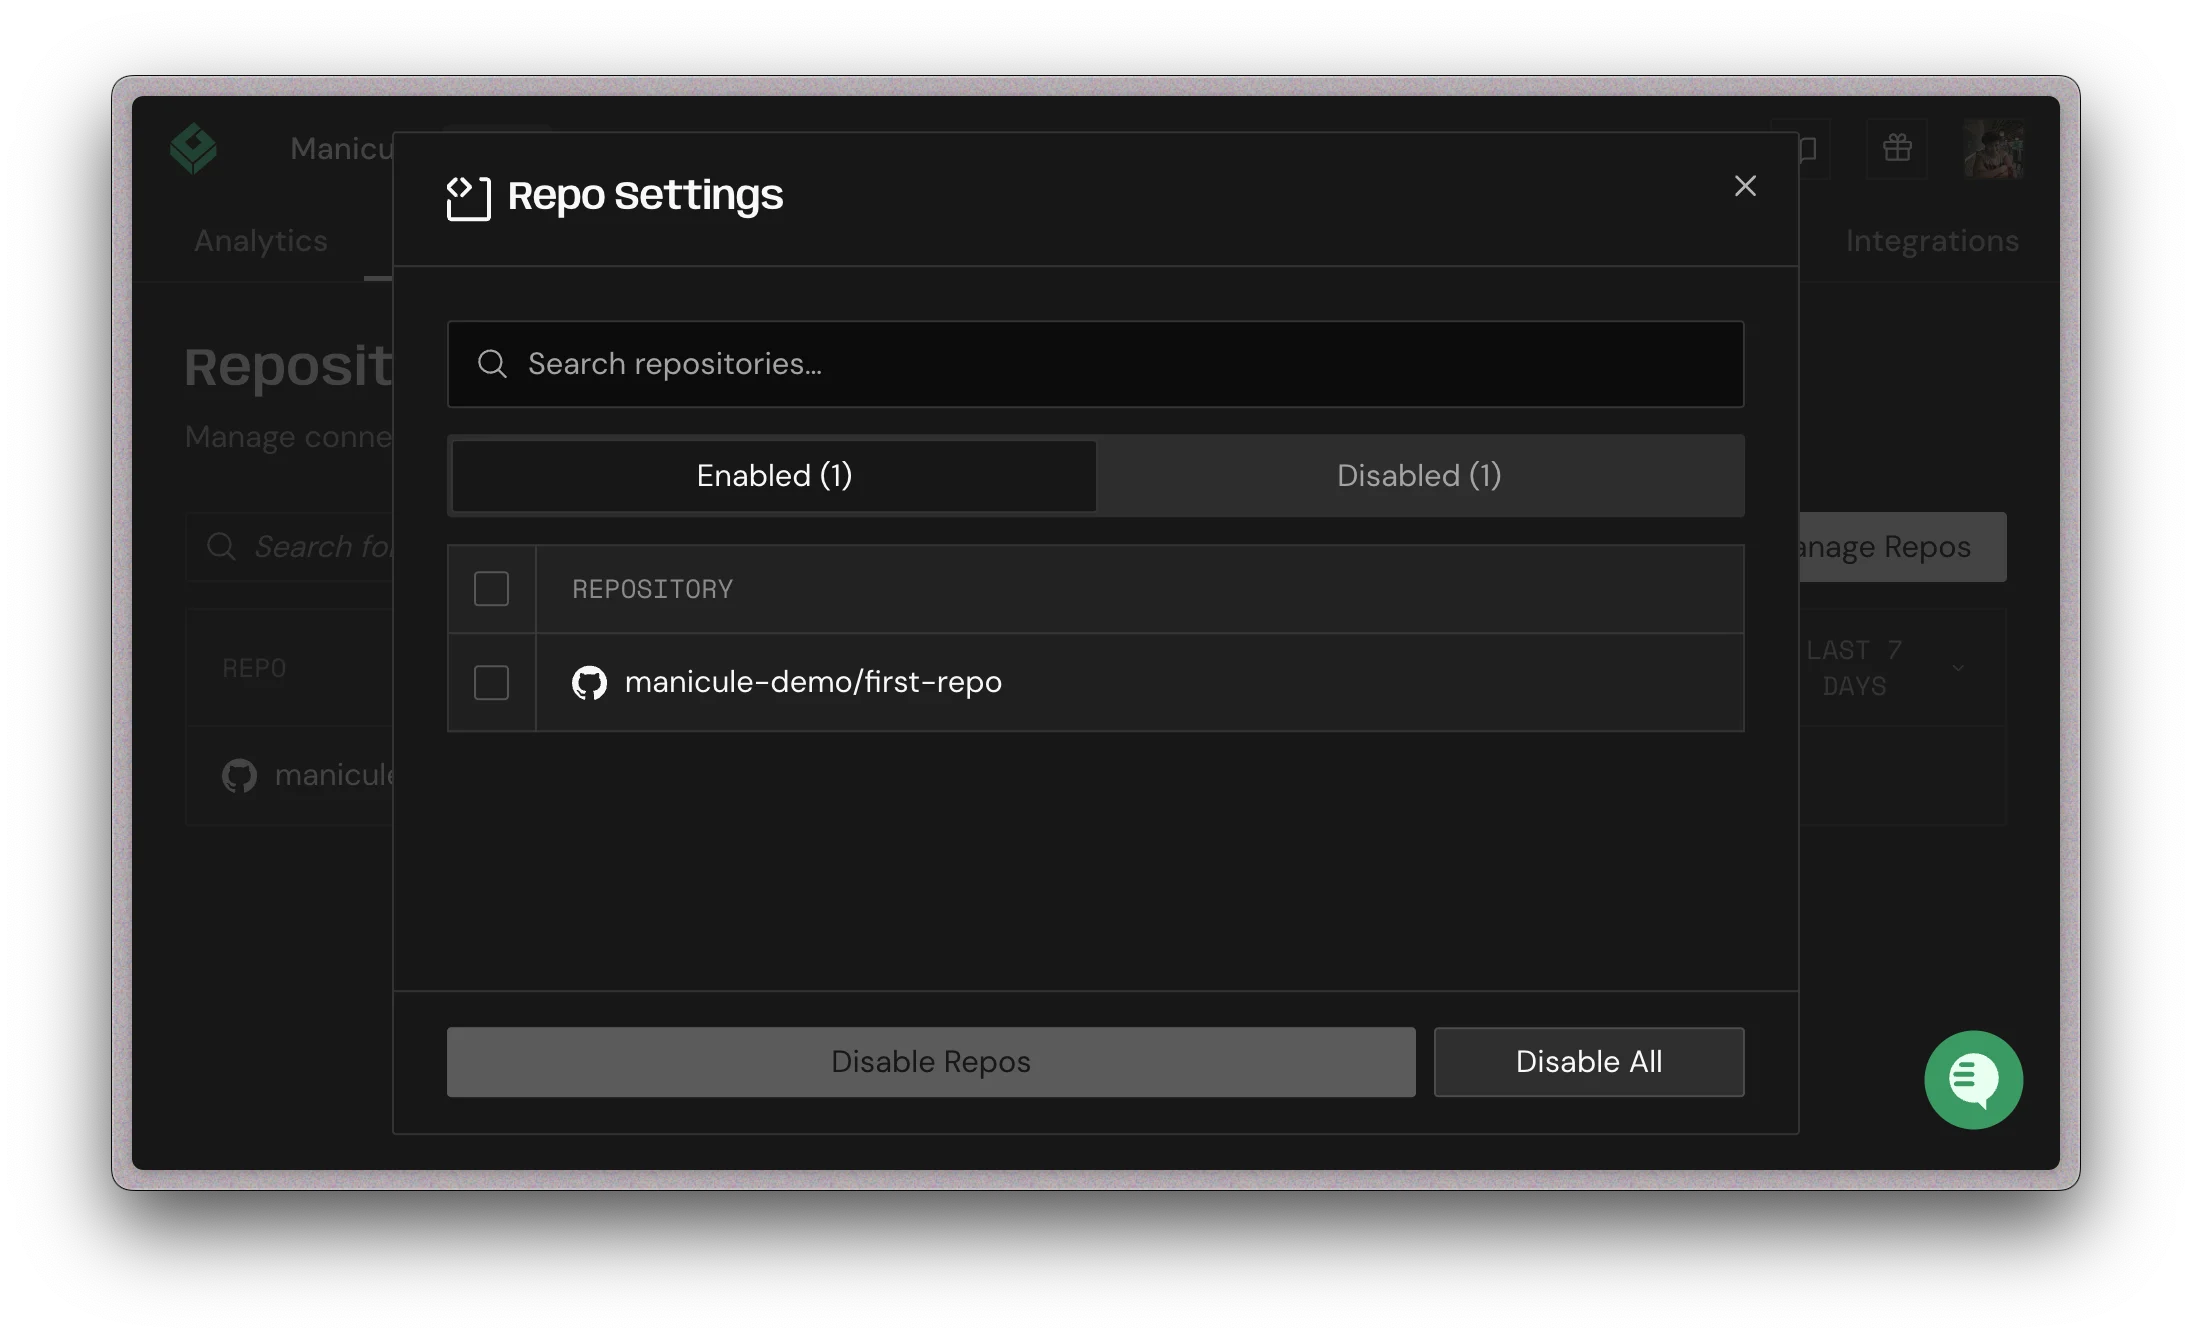 Enable or disable repositories
Customize how Greptile summarizes pull requests:
* **PR Summary**: Include a text summary of the changes
* **Confidence Score**: Show confidence levels for each PR
* **Issue Table**: Show important changed files with ratings
* **Sequence Diagram**: Add a diagram of the changes
[Learn more about PR summaries →](/code-review/first-pr-review#pr-summary)
Enable or disable repositories
Customize how Greptile summarizes pull requests:
* **PR Summary**: Include a text summary of the changes
* **Confidence Score**: Show confidence levels for each PR
* **Issue Table**: Show important changed files with ratings
* **Sequence Diagram**: Add a diagram of the changes
[Learn more about PR summaries →](/code-review/first-pr-review#pr-summary)
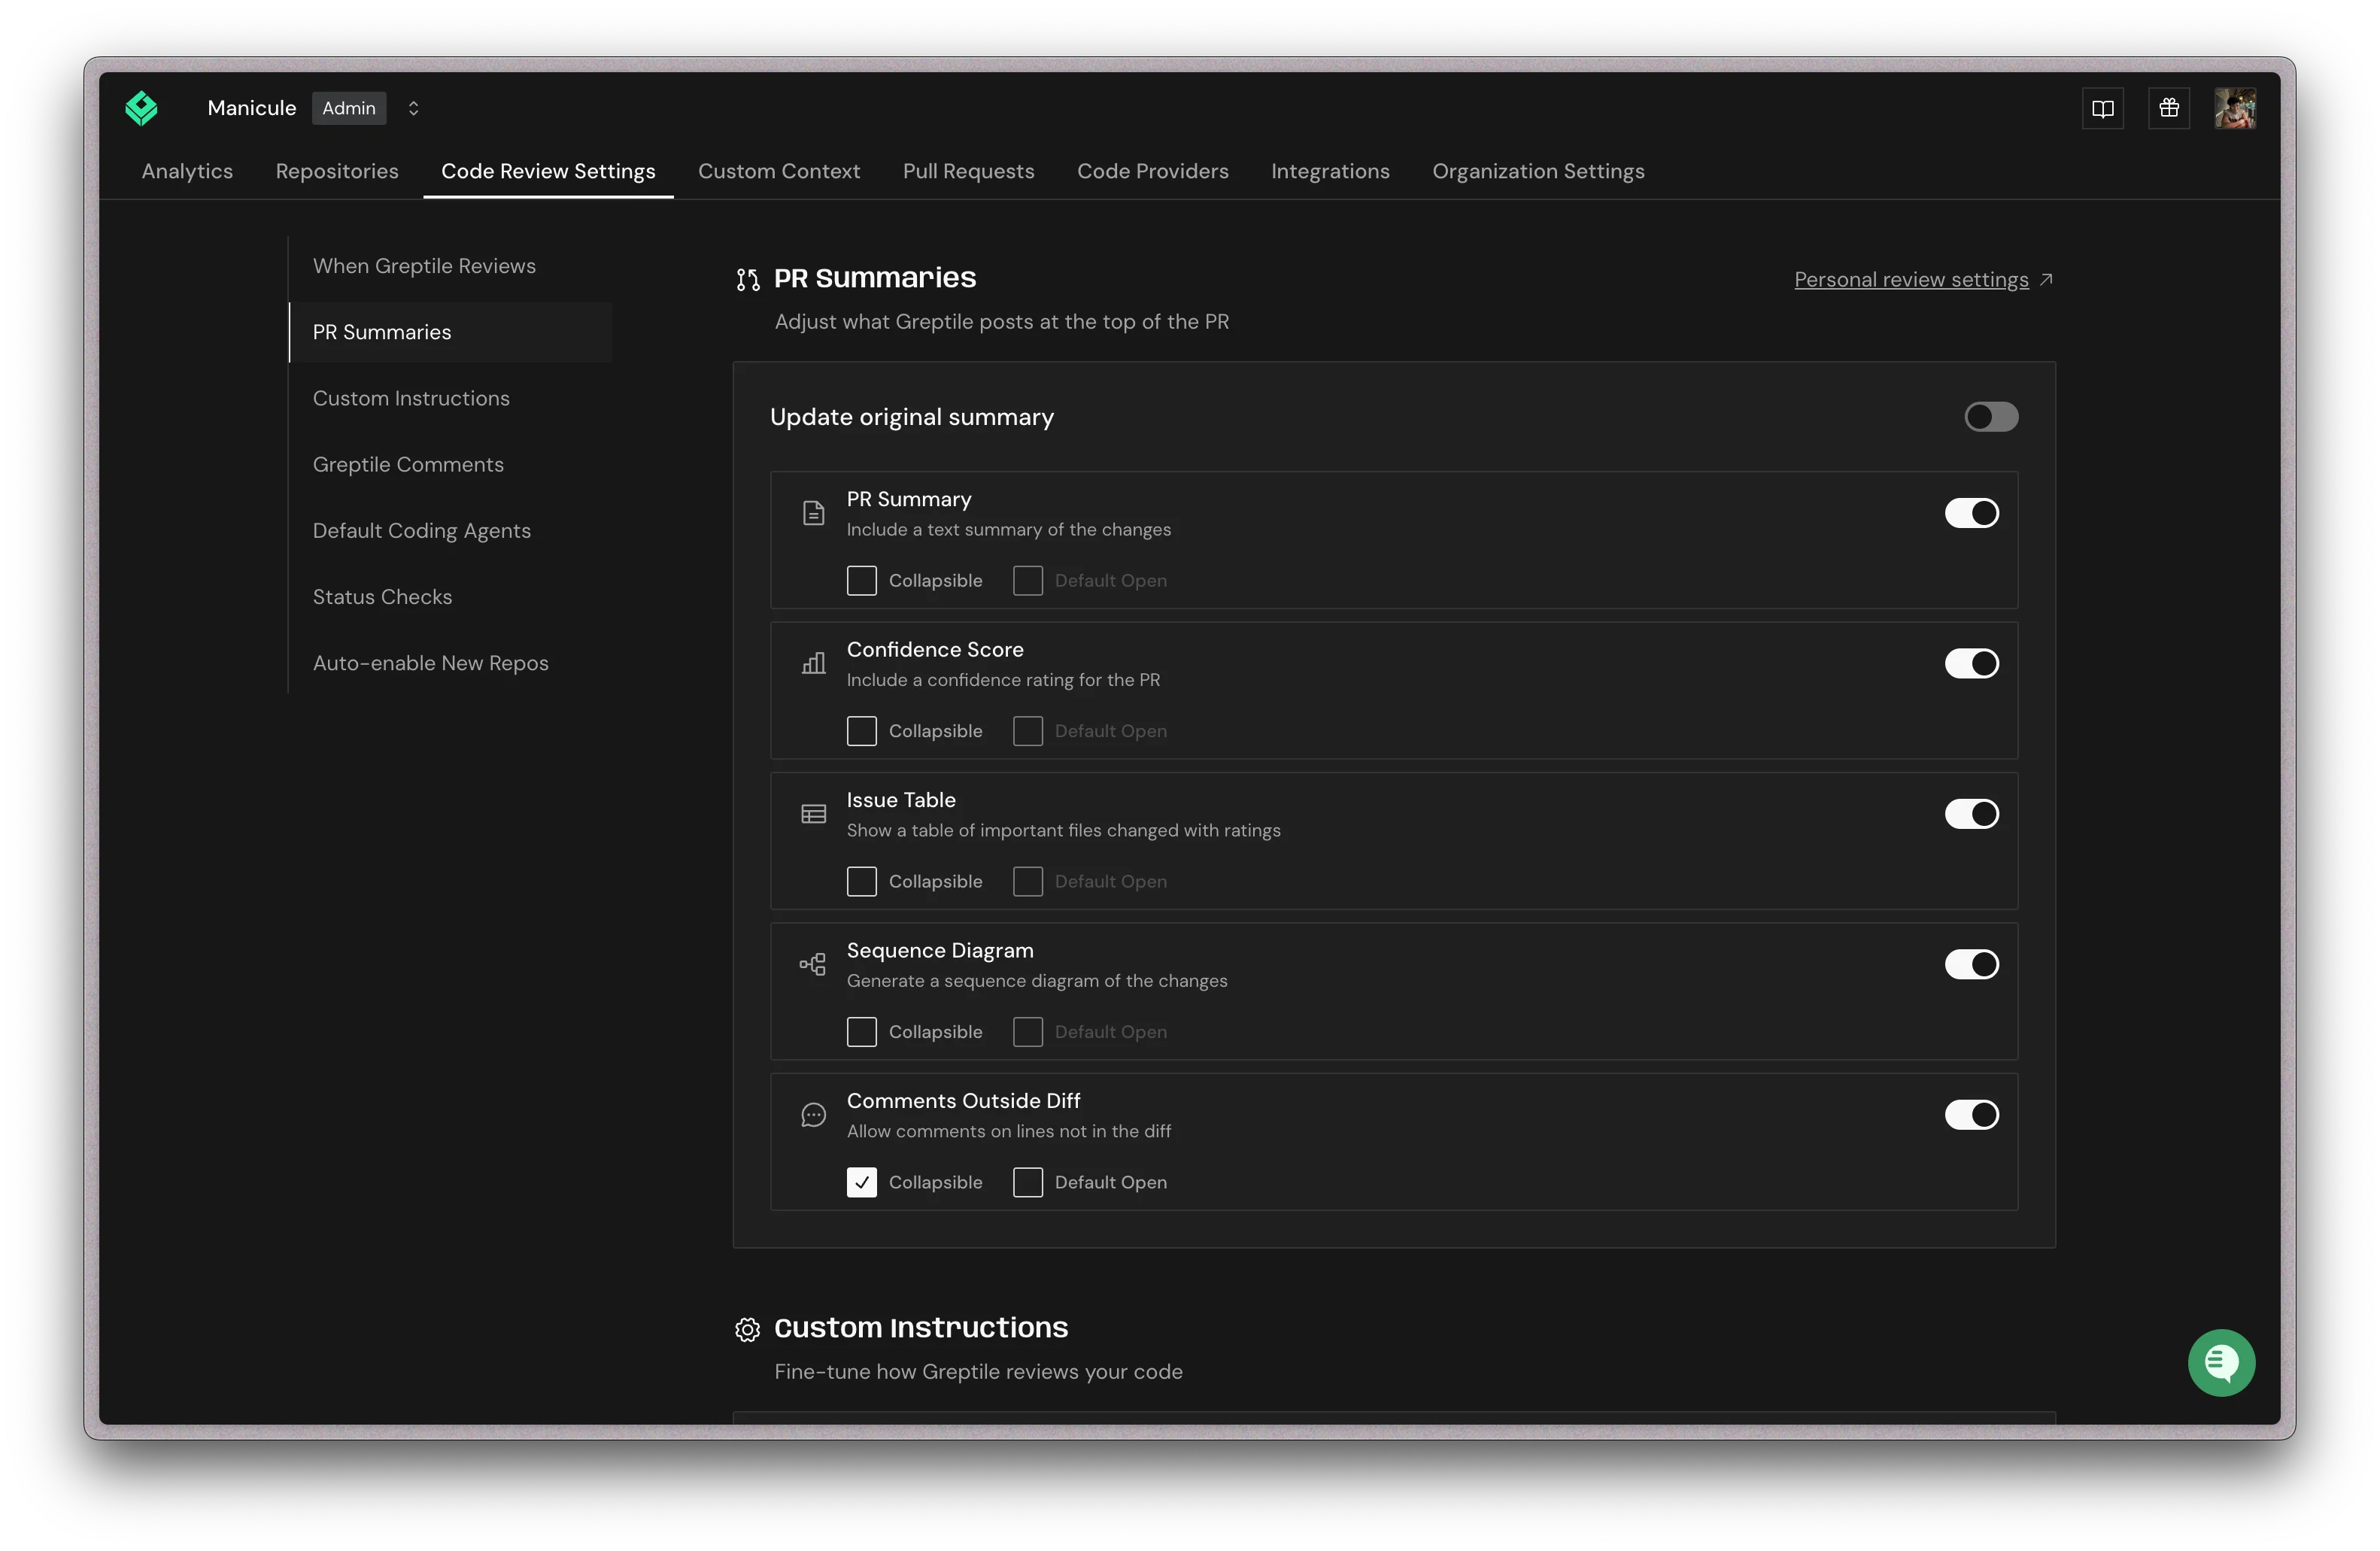 PR summary settings
Configure what Greptile comments on in **Code Review Settings**:
* **Strictness Level**: Adjust how often Greptile comments
* **Auto-review on new commits**: Review new commits after a PR is opened
* **Review draft pull requests**: Review drafts before they are marked ready
* **File change limit**: Set the largest PR Greptile reviews automatically
[Learn more about controlling nitpickiness →](/code-review/controlling-nitpickiness)
PR summary settings
Configure what Greptile comments on in **Code Review Settings**:
* **Strictness Level**: Adjust how often Greptile comments
* **Auto-review on new commits**: Review new commits after a PR is opened
* **Review draft pull requests**: Review drafts before they are marked ready
* **File change limit**: Set the largest PR Greptile reviews automatically
[Learn more about controlling nitpickiness →](/code-review/controlling-nitpickiness)
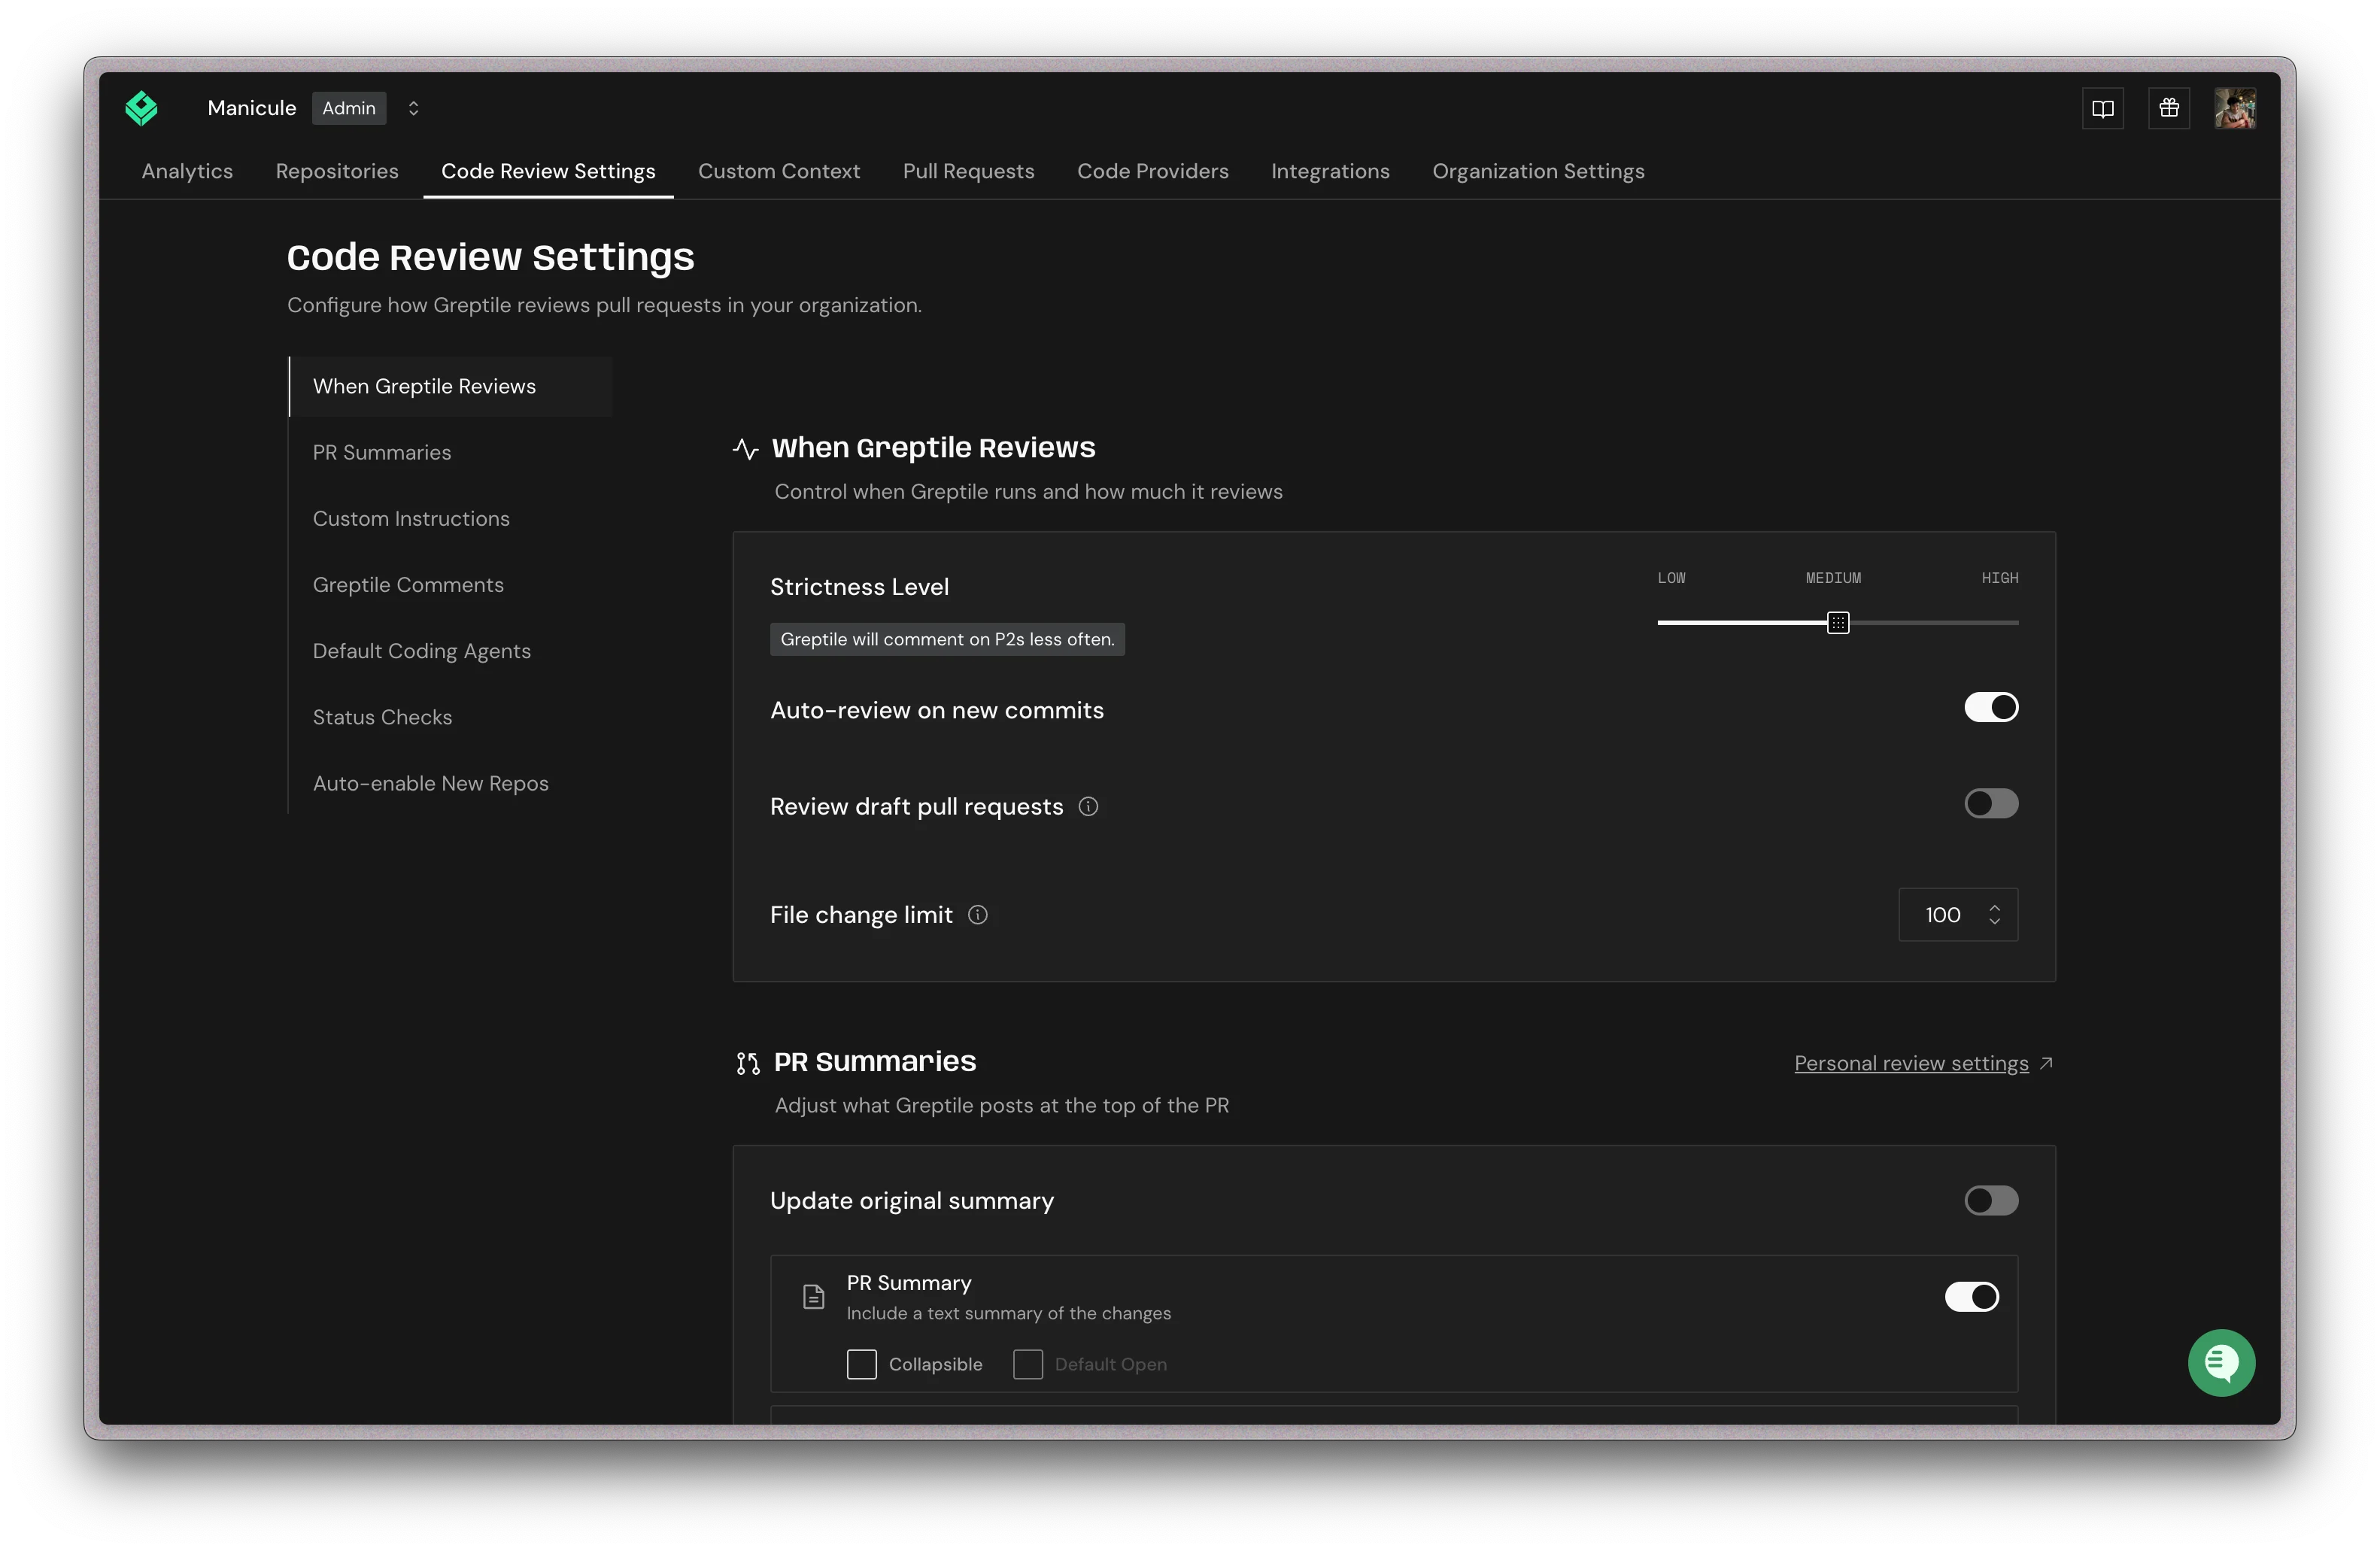 When Greptile reviews
Set when Greptile comments in **Code Review Settings** under **Greptile Comments**:
* **Labels**: Only review PRs with specific labels (e.g., "needs-review")
* **Authors**: Include/exclude specific developers or bots
* **Branches**: Target specific branches (e.g., main, develop)
* **Keywords**: Trigger on PR title/description keywords
[Learn more about triggers →](/code-review/controlling-nitpickiness#trigger-configuration)
When Greptile reviews
Set when Greptile comments in **Code Review Settings** under **Greptile Comments**:
* **Labels**: Only review PRs with specific labels (e.g., "needs-review")
* **Authors**: Include/exclude specific developers or bots
* **Branches**: Target specific branches (e.g., main, develop)
* **Keywords**: Trigger on PR title/description keywords
[Learn more about triggers →](/code-review/controlling-nitpickiness#trigger-configuration)
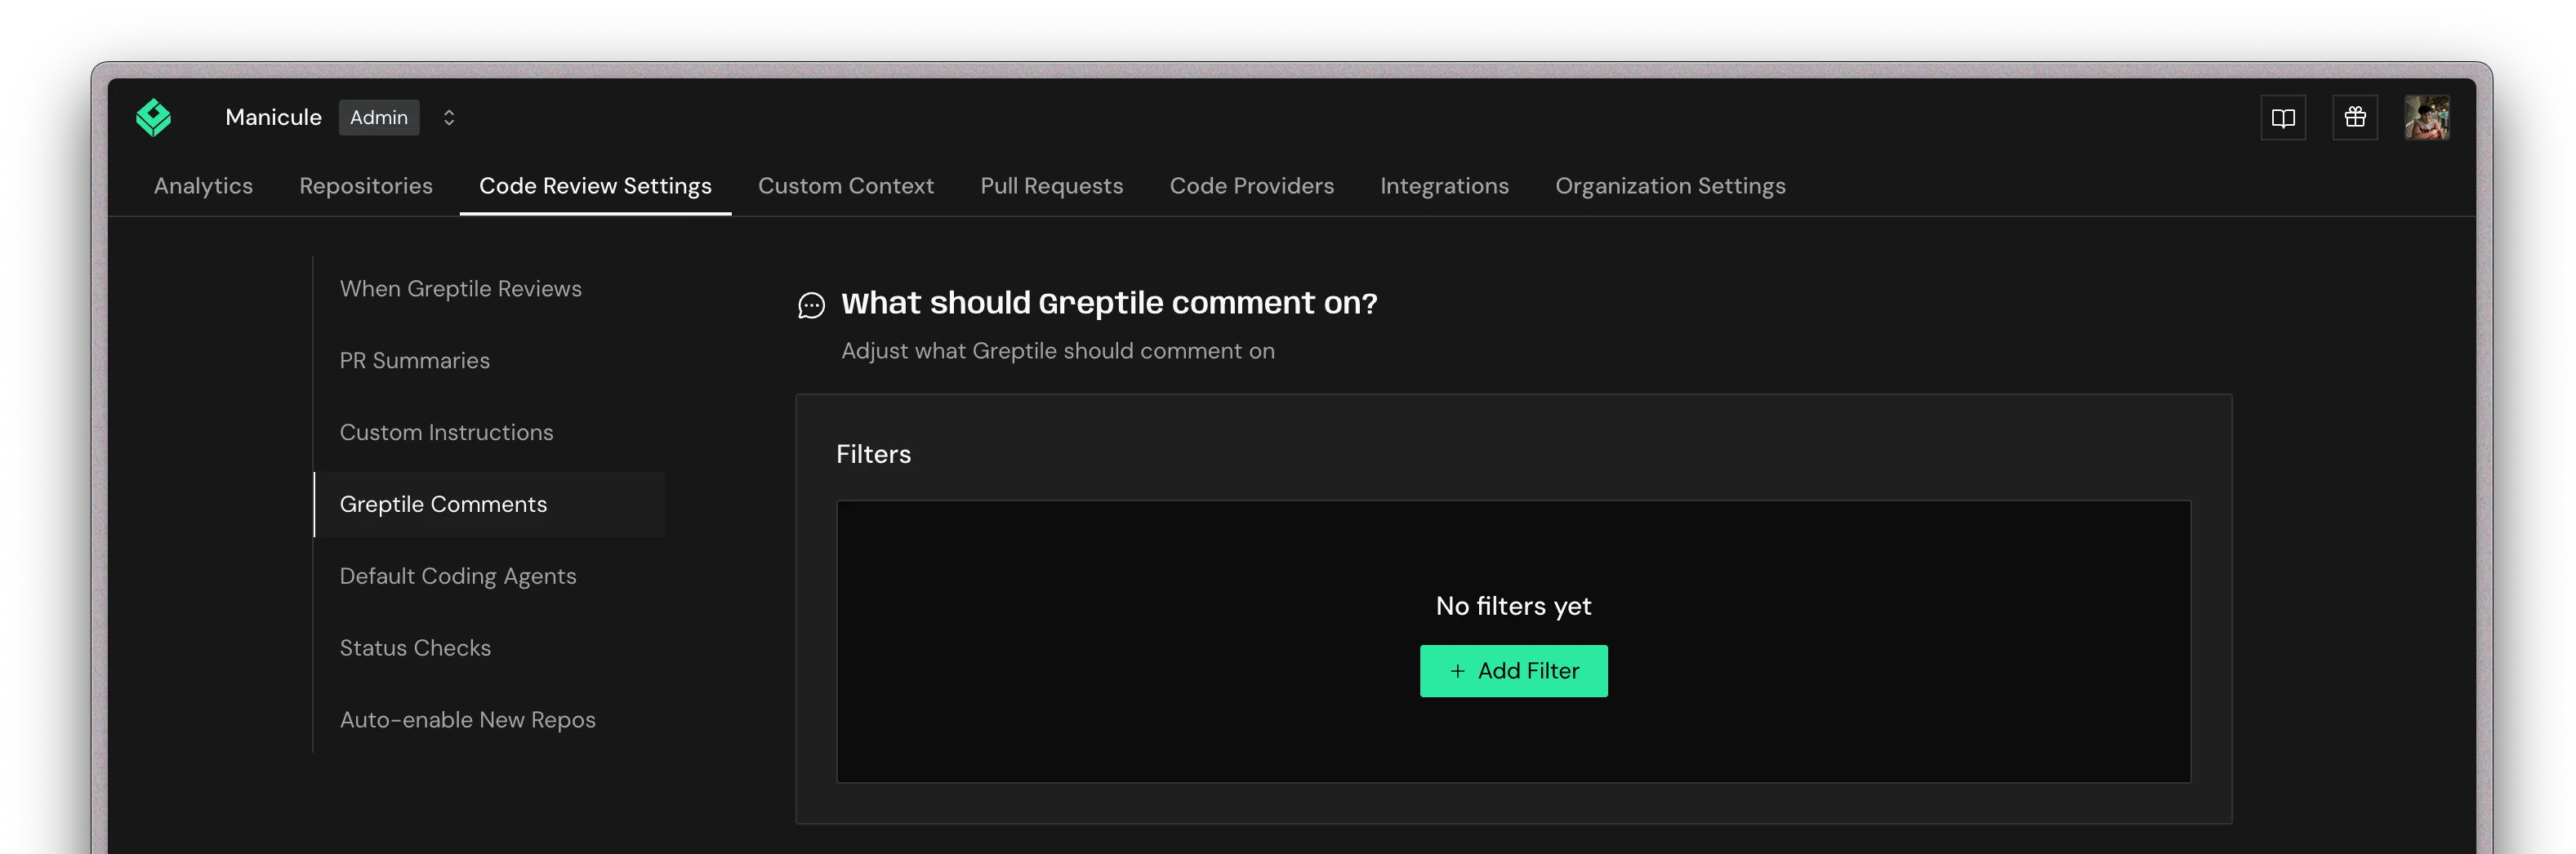 Add review filters
After a repository has been indexed (typically 1-2 hours for very large repos), any new pull/merge request will initiate automated code reviews by Greptile.
***
## Create Your First Test PR
Try Greptile on a test pull request to see it in action:
Make a test PR to your indexed repo with some code changes.
Greptile analyzes your PR with full codebase context and posts a comprehensive review.
Add review filters
After a repository has been indexed (typically 1-2 hours for very large repos), any new pull/merge request will initiate automated code reviews by Greptile.
***
## Create Your First Test PR
Try Greptile on a test pull request to see it in action:
Make a test PR to your indexed repo with some code changes.
Greptile analyzes your PR with full codebase context and posts a comprehensive review.
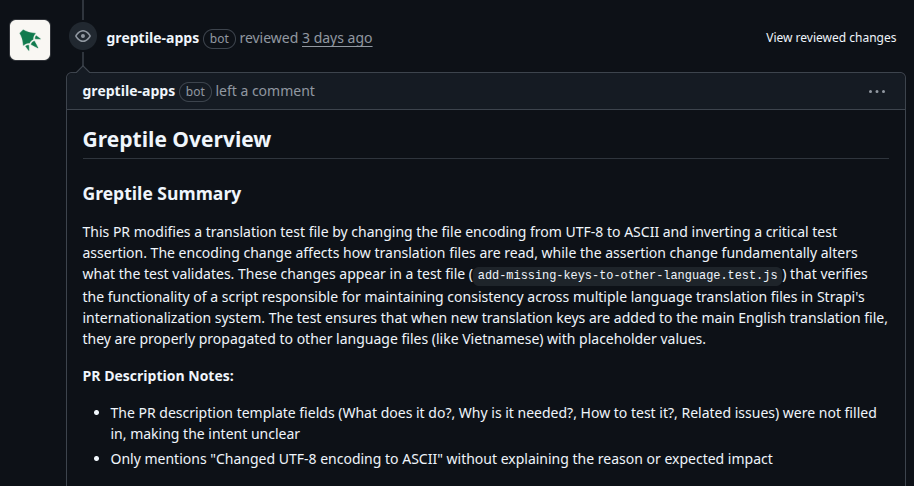
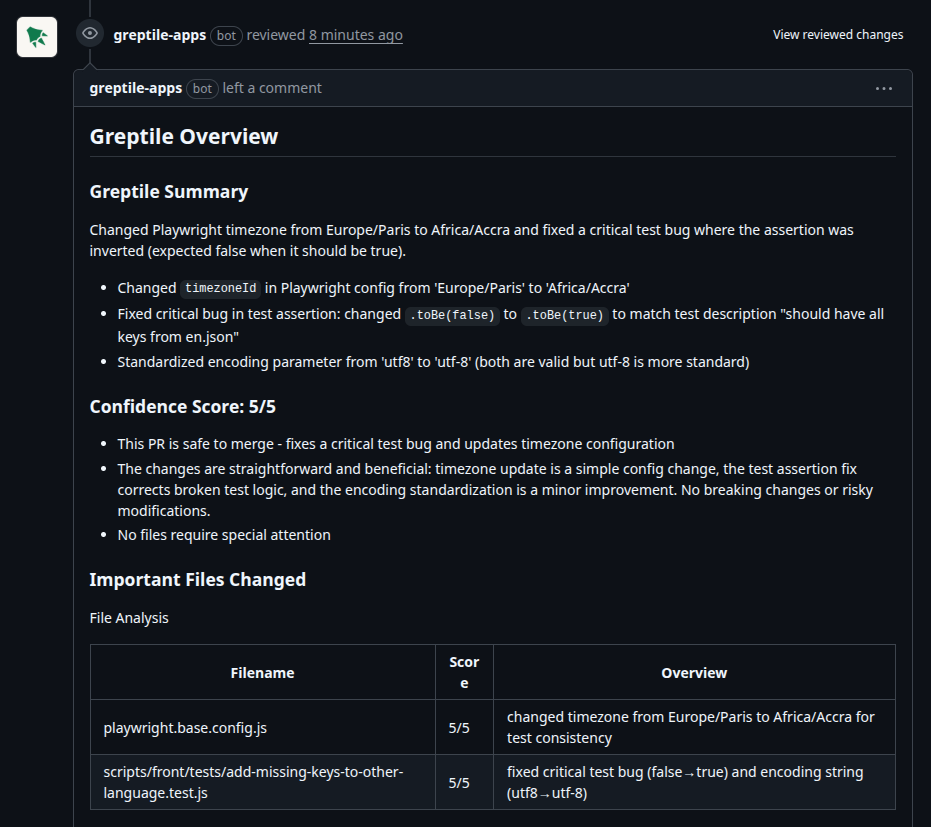 Greptile PR Comment
You'll see a summary of changes, inline comments on issues, and suggested fixes.
Greptile PR Comment
You'll see a summary of changes, inline comments on issues, and suggested fixes.
 PR Summary
When issues are spotted, Greptile suggests potential code fixes:
PR Summary
When issues are spotted, Greptile suggests potential code fixes:
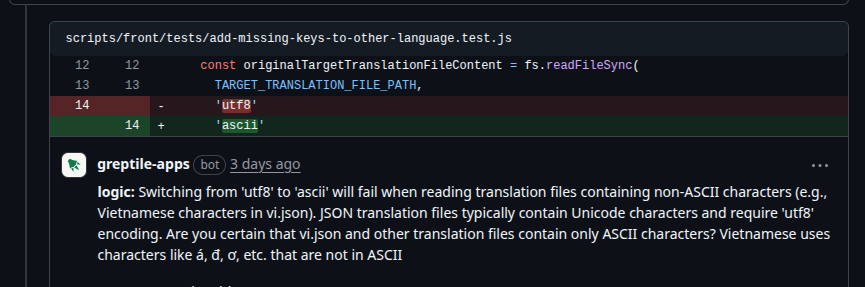 Suggest code fixes
You can trigger a code review manually by tagging **@greptileai** with a comment. This is helpful for reviewing older PRs from before Greptile was integrated.
If Greptile is enabled but does not run on a GitLab merge request, check the GitLab webhook. See [GitLab merge request not reviewed](/troubleshooting/common-issues#gitlab-merge-request-not-reviewed).
***
## What's next?
* **For developers**: Learn how to [work with Greptile reviews →](/code-review/developer-essentials)
* **For team admins**: Set up [organizations and teams →](/code-review/team-setup-basics)
* **Deep dive**: Understand the [anatomy of a review →](/code-review/first-pr-review)
Suggest code fixes
You can trigger a code review manually by tagging **@greptileai** with a comment. This is helpful for reviewing older PRs from before Greptile was integrated.
If Greptile is enabled but does not run on a GitLab merge request, check the GitLab webhook. See [GitLab merge request not reviewed](/troubleshooting/common-issues#gitlab-merge-request-not-reviewed).
***
## What's next?
* **For developers**: Learn how to [work with Greptile reviews →](/code-review/developer-essentials)
* **For team admins**: Set up [organizations and teams →](/code-review/team-setup-basics)
* **Deep dive**: Understand the [anatomy of a review →](/code-review/first-pr-review)